Terraform is a tool for managing infrastructure. It works with most cloud providers out there, but it can also (although with considerably more work) integrate with any custom solutions a company might have.
Managing infrastructure
What does it mean to manage infrastructure? Although different infrastructure management systems have different features, there are a few features that are present in most systems:
- Asset lifecycle – Adding or removing assets (machines, load balancers, switches, etc…)
- Networking – Managing how the assets communicate (networks, routes, permissions, etc…)
- Security – Secure the network and machines so it can only be accesses by the intended people
- Updates – Update the system software when necessary for security or stability reasons
Why Terraform?
There are many tools out there that allow you to manage your infrastructure (Chef, Ansible, Salt, etc…). I have worked in companies that run successfully using Chef, Ansible and Salt, so I’m sure any of the tools can be made to work. I’m writing this post about Terraform because I heard good things about it from people I admire. Two things that usually come up are an easy way to manage your whole infrastructure using configuration files, as well as making optimal changes that can be applied quickly without affecting dependent services.
Installation
To start using Terraform we need to first install it. What we install is a binary that is able to communicate with cloud providers to manage our infrastructure. I’m going to start by installing Terraform in my personal laptop. For larger teams it is probably better to manually create a machine in a cloud provider and install it there. Any person allowed to make changes to the infrastructure can SSH to this machine and do the changes from there. Because Terraform will be able to make changes to the whole infrastructure, it is important that the machine where it is installed is secure and can only be accessed by authorized people.
I used these commands to install it:
1
2
3
4
5
6
7
8
9
10
# Download the latest version of terraform to ~/Downloads folder. The version might be different
# at the time you read this. The latest version can be obtained from: https://www.terraform.io/downloads.html
wget -O ~/Downloads/terraform.zip https://releases.hashicorp.com/terraform/0.11.7/terraform_0.11.7_linux_amd64.zip

# Unzip the file. I like to put my binaries in a bin folder in my home directory
unzip ~/Downloads/terraform.zip -d ~/bin/terraform

# Finally, we add this folder to our $PATH
echo 'PATH="$PATH:$HOME/bin/terraform"' >> ~/.profile
. ~/.profile
If the installation went well, you should have the terraform command in your path:
1
2
$ terraform --version
Terraform v0.11.7
Infrastructure configuration
Terraform allows you to manage your infrastructure using configuration files. I’m just going to cover the basics here, you can find documentation about all the configuration options available in their website.
Lets start by creating a folder for our project and a configuration file:
1
2
mkdir ~/terraform-test
touch ~/terraform-test/test.tf
Terraform can integrate with a lot of cloud providers. I’m going to use DigitalOcean because I have used them in the past and I like how easy they are to use.
Let’s start modifying our test.tf file:
1
2
3
4
5
variable "do_token" {}

provider "digitalocean" {
  token = "${var.do_token}"
}
We did two thing: Created a variable called do_token (DigitalOcean token) and added a provider.
The do_token variable doesn’t have any value set at the moment. I’ll explain how to set this to our DigitalOcean token later.
The provider section allows us to configure our provider. Terraform supports many providers and more than one provider can be specified in a single file. Configuring the digitalocean provider requires to set up a single token.
Now we can initialize Terraform (It will do some local set up):
1
2
3
4
# Go to the project folder
cd ~/terraform-test/
# Initialize terraform
terraform init
All Terraform providers are implemented in different binary files. When we run terraform init, a binary for the providers specified in our configuration file will be downloaded. In this case, we will be downloading the DigitalOcean binary for Terraform. When running this command I got a warning about not specifying the version of the provider I’m using. To silence this warning we can specify a version in our provider configuration:
1
2
3
4
5
6
variable "do_token" {}

provider "digitalocean" {
  token = "${var.do_token}"
  version = "~> 0.1"
}
In our configuration file we specified the do_token variable. I’m going to explain now, how to set a value. There are multiple ways to set a variable, but I’m going to explain the one I prefer.
Create a terraform.tfvars file and Terraform will automatically load values from here. If you are saving your infrastructure configuration in version control (as you should), you should not check-in this file, since it might contain secrets:
1
touch ~/terraform-test/terraform.tfvars
And add the values there:
1
do_token = "my-token"
You should replace my-token with your actual DigitalOcean token. If you don’t have one, you can generate it from the API section in you control panel.
Resources
The next step is to start creating resources. We’ll start by creating a single machine:
1
2
3
4
5
6
7
8
9
10
11
12
13
variable "do_token" {}

provider "digitalocean" {
  token = "${var.do_token}"
  version = "~> 0.1"
}

resource "digitalocean_droplet" "nyc-001" {
  name   = "nyc-001"
  image  = "ubuntu-16-04-x64"
  region = "nyc1"
  size   = "1gb"
}
We used the resource keywork to create a droplet. Resources always contain the provider name before the resource type (digitalocean is the provider, droplet is the type) and are followed by a unique identifier for this resource. Next, we specify the type of droplet we want to create. There are multiple settings that can be configured for a droplet, but I’m just going to use the most basic here:
- name – Unique name for the resource. Anything you want to use to identify this resource
- image – Base image for the droplet. You can get a list of their base images with a command similar to this: _curl -X GET -H “Content-Type: application/json” -H “Authorization: Bearer
” “https://api.digitalocean.com/v2/images?type=distribution”_ - region – Region where you want the droplet. Certain images can only be used in certain regions. The command for getting an image will also tell you in which regions that image is available
- size – The size defines the cost of the droplet. You can get a list of the sizes available with this command: _curl -X GET -H “Content-Type: application/json” -H “Authorization: Bearer
” “https://api.digitalocean.com/v2/sizes”_
Deploying the infrastructure
We have defined our infrastructure. The next step is to actually build what we just defined. Before we do that, we can use the plan command to see what actions would be taken by Terraform:
1
2
3
4
5
6
7
8
9
10
11
12
13
14
15
16
17
18
19
20
21
22
23
24
25
26
27
28
29
30
31
32
33
34
35
36
37
38
39
40
~/terraform-test $ terraform plan
Refreshing Terraform state in-memory prior to plan...
The refreshed state will be used to calculate this plan, but will not be
persisted to local or remote state storage.


------------------------------------------------------------------------

An execution plan has been generated and is shown below.
Resource actions are indicated with the following symbols:
  + create

Terraform will perform the following actions:

  + digitalocean_droplet.nyc-001
      id:                   <computed>
      disk:                 <computed>
      image:                "ubuntu-16-04-x64"
      ipv4_address:         <computed>
      ipv4_address_private: <computed>
      ipv6_address:         <computed>
      ipv6_address_private: <computed>
      locked:               <computed>
      name:                 "nyc-001"
      price_hourly:         <computed>
      price_monthly:        <computed>
      region:               "nyc1"
      resize_disk:          "true"
      size:                 "1gb"
      status:               <computed>
      vcpus:                <computed>


Plan: 1 to add, 0 to change, 0 to destroy.

------------------------------------------------------------------------

Note: You didn't specify an "-out" parameter to save this plan, so Terraform
can't guarantee that exactly these actions will be performed if
"terraform apply" is subsequently run.
As expected, the output is telling us that a new droplet will be created. Let’s go ahead an create our infrastructure:
1
2
3
4
5
6
7
8
9
10
11
12
13
14
15
16
17
18
19
20
21
22
23
24
25
26
27
28
29
30
31
32
33
34
35
36
37
38
39
40
41
42
43
44
45
46
47
48
49
50
51
52
53
54
55
56
~/terraform-test $ terraform apply

An execution plan has been generated and is shown below.
Resource actions are indicated with the following symbols:
  + create

Terraform will perform the following actions:

  + digitalocean_droplet.nyc-001
      id:                   <computed>
      disk:                 <computed>
      image:                "ubuntu-16-04-x64"
      ipv4_address:         <computed>
      ipv4_address_private: <computed>
      ipv6_address:         <computed>
      ipv6_address_private: <computed>
      locked:               <computed>
      name:                 "nyc-001"
      price_hourly:         <computed>
      price_monthly:        <computed>
      region:               "nyc1"
      resize_disk:          "true"
      size:                 "1gb"
      status:               <computed>
      vcpus:                <computed>


Plan: 1 to add, 0 to change, 0 to destroy.

Do you want to perform these actions?
  Terraform will perform the actions described above.
  Only 'yes' will be accepted to approve.

  Enter a value: yes

digitalocean_droplet.nyc-001: Creating...
  disk:                 "" => "<computed>"
  image:                "" => "ubuntu-16-04-x64"
  ipv4_address:         "" => "<computed>"
  ipv4_address_private: "" => "<computed>"
  ipv6_address:         "" => "<computed>"
  ipv6_address_private: "" => "<computed>"
  locked:               "" => "<computed>"
  name:                 "" => "nyc-001"
  price_hourly:         "" => "<computed>"
  price_monthly:        "" => "<computed>"
  region:               "" => "nyc1"
  resize_disk:          "" => "true"
  size:                 "" => "1gb"
  status:               "" => "<computed>"
  vcpus:                "" => "<computed>"
digitalocean_droplet.nyc-001: Still creating... (10s elapsed)
digitalocean_droplet.nyc-001: Still creating... (20s elapsed)
digitalocean_droplet.nyc-001: Creation complete after 25s (ID: 94841577)

Apply complete! Resources: 1 added, 0 changed, 0 destroyed.
After the command is finished we can see our droplet in Digital Ocean:
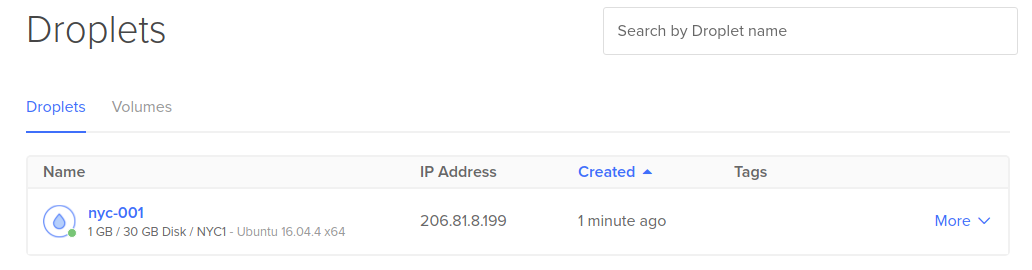
We can update our infrastructure (add a new droplet):
1
2
3
4
5
6
7
8
9
10
11
12
13
14
15
16
17
18
19
20
variable "do_token" {}

provider "digitalocean" {
  token = "${var.do_token}"
  version = "~> 0.1"
}

resource "digitalocean_droplet" "nyc-001" {
  image  = "ubuntu-16-04-x64"
  name   = "nyc-001"
  region = "nyc1"
  size   = "1gb"
}

resource "digitalocean_droplet" "nyc-002" {
  image  = "ubuntu-16-04-x64"
  name   = "nyc-002"
  region = "nyc1"
  size   = "1gb"
}
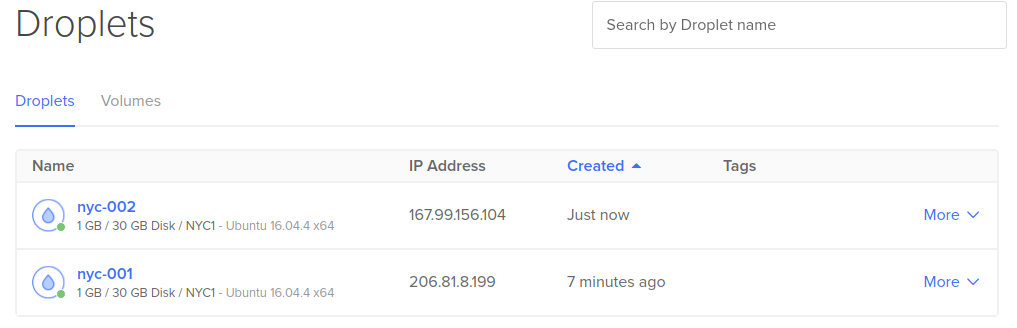
And when we run apply again, a new droplet will be created without affecting the already existing one:
1
2
3
4
5
6
7
8
9
10
11
12
13
14
15
16
17
18
19
20
21
22
23
24
25
26
27
28
29
30
31
32
33
34
35
36
37
38
39
40
41
42
43
44
45
46
47
48
49
50
51
52
53
54
55
56
57
~/terraform-test $ terraform apply
digitalocean_droplet.nyc-001: Refreshing state... (ID: 94841577)

An execution plan has been generated and is shown below.
Resource actions are indicated with the following symbols:
  + create

Terraform will perform the following actions:

  + digitalocean_droplet.nyc-002
      id:                   <computed>
      disk:                 <computed>
      image:                "ubuntu-16-04-x64"
      ipv4_address:         <computed>
      ipv4_address_private: <computed>
      ipv6_address:         <computed>
      ipv6_address_private: <computed>
      locked:               <computed>
      name:                 "nyc-002"
      price_hourly:         <computed>
      price_monthly:        <computed>
      region:               "nyc1"
      resize_disk:          "true"
      size:                 "1gb"
      status:               <computed>
      vcpus:                <computed>


Plan: 1 to add, 0 to change, 0 to destroy.

Do you want to perform these actions?
  Terraform will perform the actions described above.
  Only 'yes' will be accepted to approve.

  Enter a value: yes

digitalocean_droplet.nyc-002: Creating...
  disk:                 "" => "<computed>"
  image:                "" => "ubuntu-16-04-x64"
  ipv4_address:         "" => "<computed>"
  ipv4_address_private: "" => "<computed>"
  ipv6_address:         "" => "<computed>"
  ipv6_address_private: "" => "<computed>"
  locked:               "" => "<computed>"
  name:                 "" => "nyc-002"
  price_hourly:         "" => "<computed>"
  price_monthly:        "" => "<computed>"
  region:               "" => "nyc1"
  resize_disk:          "" => "true"
  size:                 "" => "1gb"
  status:               "" => "<computed>"
  vcpus:                "" => "<computed>"
digitalocean_droplet.nyc-002: Still creating... (10s elapsed)
digitalocean_droplet.nyc-002: Still creating... (20s elapsed)
digitalocean_droplet.nyc-002: Creation complete after 23s (ID: 94842062)

Apply complete! Resources: 1 added, 0 changed, 0 destroyed.
We can also remove machines:
1
2
3
4
5
6
variable "do_token" {}

provider "digitalocean" {
  token = "${var.do_token}"
  version = "~> 0.1"
}
1
2
3
4
5
6
7
8
9
10
11
12
13
14
15
16
17
18
19
20
21
22
23
24
25
26
27
28
29
30
31
~/terraform-test $ terraform apply
digitalocean_droplet.nyc-001: Refreshing state... (ID: 94841577)
digitalocean_droplet.nyc-002: Refreshing state... (ID: 94842062)

An execution plan has been generated and is shown below.
Resource actions are indicated with the following symbols:
  - destroy

Terraform will perform the following actions:

  - digitalocean_droplet.nyc-001

  - digitalocean_droplet.nyc-002


Plan: 0 to add, 0 to change, 2 to destroy.

Do you want to perform these actions?
  Terraform will perform the actions described above.
  Only 'yes' will be accepted to approve.

  Enter a value: yes

digitalocean_droplet.nyc-002: Destroying... (ID: 94842062)
digitalocean_droplet.nyc-001: Destroying... (ID: 94841577)
digitalocean_droplet.nyc-002: Still destroying... (ID: 94842062, 10s elapsed)
digitalocean_droplet.nyc-001: Still destroying... (ID: 94841577, 10s elapsed)
digitalocean_droplet.nyc-002: Destruction complete after 11s
digitalocean_droplet.nyc-001: Destruction complete after 11s

Apply complete! Resources: 0 added, 0 changed, 2 destroyed.
And the droplets are deleted from Digital Ocean:

Conclusion
This is just the beginning of what can be done with Terraform, there are many other resources and cloud providers that can be configured to great detail. I might write some other related articles in the future but If you want to go into deeper detail, their documentation should provide everything you need.
automation linux productivity terraform