Google uses the concept of Virtual Private Cloud (VPC) to refer to their capability for creating your own private network withing their infrastructure. There are a few terms that will allow us to create a network of our design:
- Network – This is a virtual (because everything is virtual in the cloud) network that can span across the globe
- Subnet – This is an IP range that can be used by machines in a single region
- Firewall – Used to limit communication between machines in the same network
Network
A network (or VPC) is just a name used to group your network infrastructure. Subnets are defined inside a network and each host is part of one subnet.
Subnets
Subnets can be defined by region. You can choose any IP range defined as private as specified in RFC-1918 (basically anything inside these ranges: 10.0.0.0 – 10.255.255.255, 172.16.0.0 – 172.31.255.255 and 192.168.0.0 – 192.168.255.255).
Example network
The best way to understand how networking works on Google Cloud is to create an example network. Before we start clicking buttons and configuring things in the console, lets start by defining what we want to build:
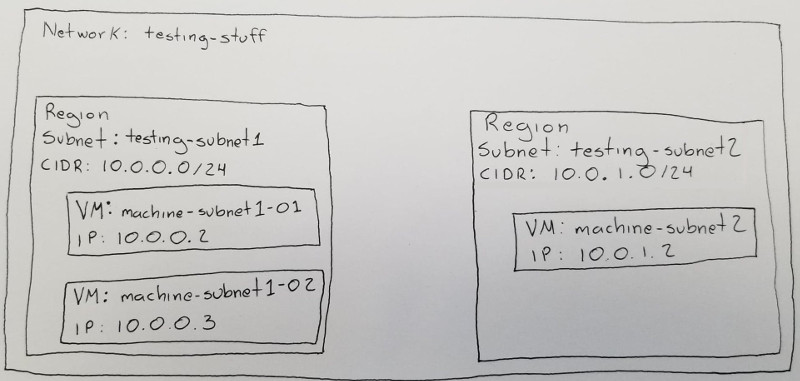
This is one simple network with two subnets. testing-subnet1 has an IP range from 10.0.0.0 to 10.0.0.255, but currently only contains two machines. testing-subnet2 has an IP range of 10.0.1.0 to 10.0.1.255 and starts with one machine.
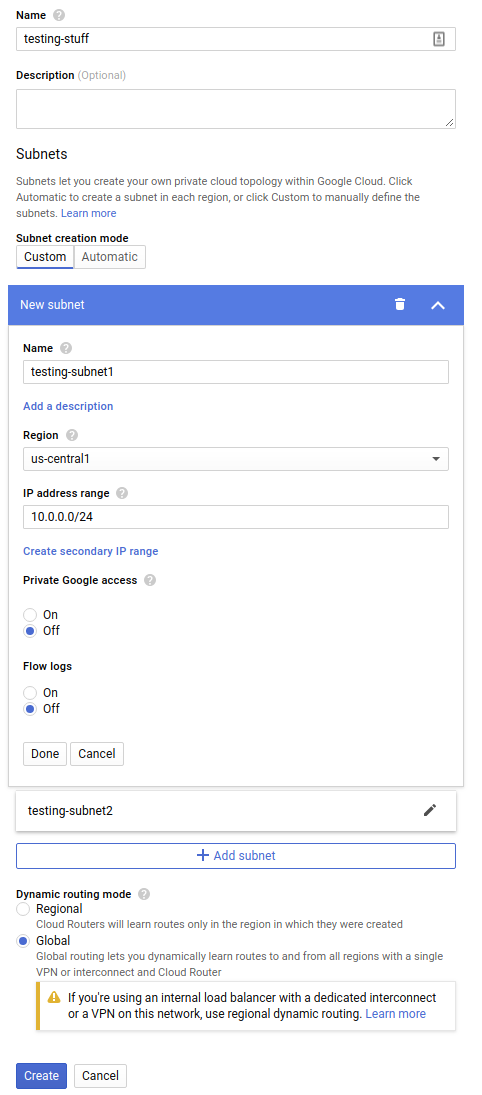
The network and subnets can be created from Google Cloud console. We just need to enter the name for the network and the name, region and CIDR for the subnets:
The next step is to create the virtual machines. There are a few options to choose here, but the ones we care about are the machine name and the IP address (which can be set in the network section):
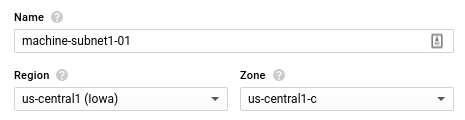

An important thing to remember is that subnets are coupled to a zone, so we need to create the machine in the zone it corresponds for the subnet it belongs. The screenshots above correspond to machine-subnet1-01, which is in us-central zone. The same process can be followed to create the other two machines.
Accessing machines
The machines we just created are given an external IP address, but are not accessible because the firewall rules are closed by default. One of the first things you might want to do with your machines is SSH into them.
In a production system you might want to allow SSH access from the internet to a single machine (bastion server), and access all other machines by first SSHing into the bastion server. For my example, this is not really important so we will be able to SSH to all machines from the internet.
We can open SSH access to all machines in our network by creating a new firewall rule:
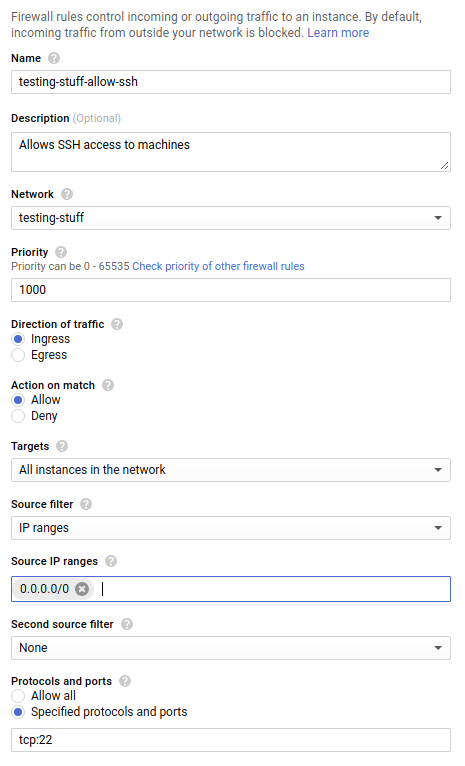
The name can be anything you want (I like to include the word allow in rules that allow traffic to flow). What the rule does is allow ingress traffic from any IP address in the world (0.0.0.0/0 is CIDR for this) to port 22 in all machines in testing-stuff network.
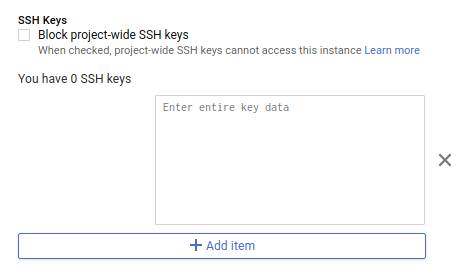
Before we can access the machines we need to register SSH keys with them. Generate an SSH key and add it to the list of SSH keys allowed by the machine
Now everything in ready to SSH to the machine:
1
ssh myself@35.125.48.51
Communication between machines
Accessing machines in the network is important, but for our network to work we also need applications running on it to be able to communicate between each other. It would be possible to allow all traffic to flow freely inside our network, but that might be dangerous if someone gets access to our network. The safest thing to do is to allow traffic just where it is necessary. For example, if you have a MySQL database you probably want to open TCP port 3306 on the machine that is running it. Even better, you can allow traffic just from specific internal IP addresses.
Let’s say we have a MySQL database running in machine-subnet1-01 and we want an application running in machine-subnet1-02 to be able to access it. This is how that rule would look:
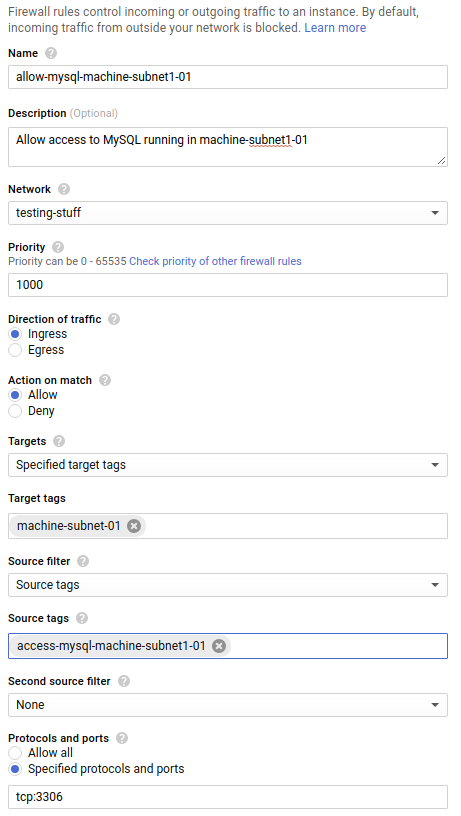
This time we are creating a firewall rule that allows ingress traffic on TCP port 3306. We specify that the target of this rule are machines tagged machine-subnet1-01, so we will have to add this tag to our machine. We also specify that only machines with tag access-mysql-machine-subnet1-01 can use this rule, so we need to add this tag to machine-subnet1-02.
If the tags are added to the machines, the result will be machine-subnet1-02 can connect to MySQL running in machine-subnet1-01, but machine-subnet2-01 can’t.
Final thoughts
Customizing your network from here will probably consist on adding more subnets, machines or firewall rules according to the specific needs. Inside the network we just created we can use the internal IPs we assigned to communicate between machines, or we can use the hostname (e.g. machine-subnet1-01). The hostnames are only useful inside the network. If you want to be able to access one of your machines from the internet using a name, you will need to register a domain name and point your DNS to the correct machine.
linux security networking