I am resuming my journey to learning Android development and for this article I will focus on the UI. On this post I will explain how to add labels, buttons and related elements so the user can interact with our app.
The way I see building UIs for Android is very similar to they way they are built for the web. You can do it in two ways: programmatically or declaratively. Programmatically means creating elements using Java code and declaratively means using XML files. If you are familiar with web development, this is analogous to how JavaScript and HTML interact. As on Web, the recommended way is to do it declaratively whenever possible since it is usually faster.
While designing a user interface for android it is important to keep in mind Android design guidelines to give the user a consistent experience among different apps.
Loading a layout
Layouts are containers that allow you to group and organize components on your UI. Before explaining how the layouts work I want to show how you can load a layout into your app:
1
2
3
4
5
public void onCreate(Bundle savedInstanceState)
{
    super.onCreate(savedInstanceState);
    setContentView(R.layout.main);
}
You can see how we use the setContentView function to load a layout for us. Now, the argument we are passing may be a little confusing. What happens is that the android sdk will automatically create R.layout.
Referencing a UI element from code
When you create a UI using the declarative way you need a way to reference your element from code so you can interact with them. To easily do this, Android uses the id attribute:
1
<Button android:id="@+id/my_button" />
The @ sign tells the parser that it should expand whatever comes next. The + sign means that it is a new resource that will be created and added to our resources. Finally the my_button string is an arbitrary string that we used to identify this element so we can reference it from code:
1
Button myButton = (Button)findViewById(R.id.my_button);
Inputs
Android SDK provides many kinds of inputs that can be used to get information from the user. Namely you can use these controls on your apps: Button, Text field, Checkbox, Radio button, Toggle button, Spinner and Pickers. Lets look at a very quick example:
1
2
3
4
5
6
7
8
9
10
11
12
13
14
15
16
17
18
19
20
21
22
23
24
25
26
27
28
<?xml version="1.0" encoding="utf-8"?>
<LinearLayout xmlns:android="http://schemas.android.com/apk/res/android"
       android:layout_height="fill_parent"
       android:layout_width="fill_parent"
       android:orientation="vertical">
    <EditText android:id="@+id/edit_message"
           android:layout_width="fill_parent"
           android:layout_height="wrap_content"
           android:hint="Text"/>
    <Button android:id="@+id/button_send"
           android:layout_width="wrap_content"
           android:layout_height="wrap_content"
           android:text="Button"
           android:onClick="sendMessage"/>
    <CheckBox android:id="@+id/checkbox_meat"
           android:layout_width="wrap_content"
           android:layout_height="wrap_content"
           android:text="Check"/>
    <RadioButton android:id="@+id/radio_pirates"
           android:layout_width="wrap_content"
           android:layout_height="wrap_content"
           android:text="Radio"/>
    <ToggleButton android:id="@+id/togglebutton"
           android:layout_width="wrap_content"
           android:layout_height="wrap_content"
           android:textOn="I'm on"
           android:textOff="I'm off"/>
</LinearLayout>
We created a screen with some of the different kinds of inputs. You can see that most of them use the layout_width and layout_height to define their size. Most of them use wrap_content which means that they will be big enough to hold their content, you can also specify a dimension to give an specific size.
Images
Images in Android fall into the resources category. This means that you need to place all your images inside res/drawable/. Once an image is in that folder (ex: res/drawable/sun.jpg) you can add it to you app using an ImageView:
1
2
3
4
<ImageView android:id="@+id/image"
        android:layout_height="wrap_content"
        android:layout_width="wrap_content"
        android:src="@drawable/sun"/>
Layouts
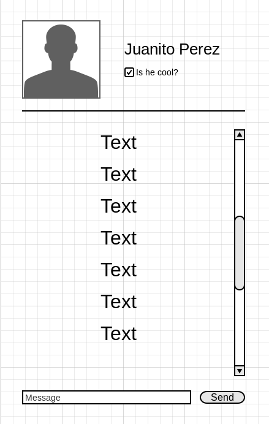
Now that we know how to put elements on the screen we want to be able to put them where we want them. To learn this I am going to do a little exercise. I’m going to use different layouts to create this UI:
Lets go over the different kind of layouts really fast to see which ones can help us achieve this:
- LinearLayout aligns all children in a single direction, vertically or horizontally.
- RelativeLayout displays child views in relative positions. The position of each view can be specified as relative to sibling elements or in positions relative to the parent.
- ListView displays a list of scrollable items. The list items are automatically inserted to the list using an Adapter that pulls content from a source such as an array or database query and converts each item result into a view that’s placed into the list.
- GridView displays items in a two-dimensional, scrollable grid. The grid items are automatically inserted to the layout using a ListAdapter.
The simplest way to achieve what we want would probably be to have a lot of nested LinearLayout but the documentation recommends to instead use RelativeLayout for performance reasons. ListView and GridView seem to be more focused on dynamic content so we will not use them this time.
Lets start by dumping our elements in an xml file:
1
2
3
4
5
6
7
8
9
10
11
12
13
14
15
16
17
18
19
20
21
22
23
24
25
26
27
28
29
30
31
32
33
34
35
36
37
38
39
40
41
42
43
44
45
46
47
48
49
50
51
52
53
54
55
56
57
58
59
60
61
62
63
64
65
<?xml version="1.0" encoding="utf-8"?>
<LinearLayout xmlns:android="http://schemas.android.com/apk/res/android"
        android:layout_height="fill_parent"
        android:layout_width="fill_parent"
        android:orientation="vertical">
    <ImageView android:id="@+id/image"
            android:layout_height="wrap_content"
            android:layout_width="wrap_content"
            android:src="@drawable/sun"/>
    <TextView android:id="@+id/name"
            android:layout_width="wrap_content"
            android:layout_height="wrap_content"
            android:text="Juanito Perez"/>
    <CheckBox android:id="@+id/cool"
            android:layout_width="wrap_content"
            android:layout_height="wrap_content"
            android:text="Is he cool?"/>
    <View android:id="@+id/ruler"
            android:layout_width="fill_parent"
            android:layout_height="1px"
            android:background="#FF00FF00"/>
    <LinearLayout
            android:layout_height="wrap_content"
            android:layout_width="fill_parent"
            android:orientation="vertical">
        <TextView android:layout_width="wrap_content"
                android:layout_height="wrap_content"
                android:text="Text"/>
        <TextView android:layout_width="wrap_content"
                android:layout_height="wrap_content"
                android:text="Text"/>
        <TextView android:layout_width="wrap_content"
                android:layout_height="wrap_content"
                android:text="Text"/>
        <TextView android:layout_width="wrap_content"
                android:layout_height="wrap_content"
                android:text="Text"/>
        <TextView android:layout_width="wrap_content"
                android:layout_height="wrap_content"
                android:text="Text"/>
        <TextView android:layout_width="wrap_content"
                android:layout_height="wrap_content"
                android:text="Text"/>
        <TextView android:layout_width="wrap_content"
                android:layout_height="wrap_content"
                android:text="Text"/>
        <TextView android:layout_width="wrap_content"
                android:layout_height="wrap_content"
                android:text="Text"/>
        <TextView android:layout_width="wrap_content"
                android:layout_height="wrap_content"
                android:text="Text"/>
        <TextView android:layout_width="wrap_content"
                android:layout_height="wrap_content"
                android:text="Text"/>
    </LinearLayout>
    <EditText android:id="@+id/message"
            android:layout_width="fill_parent"
            android:layout_height="wrap_content"
            android:hint="Message"/>
    <Button android:id="@+id/send"
            android:layout_width="fill_parent"
            android:layout_height="wrap_content"
            android:text="Send"/>
</LinearLayout>
The result will be something like this:
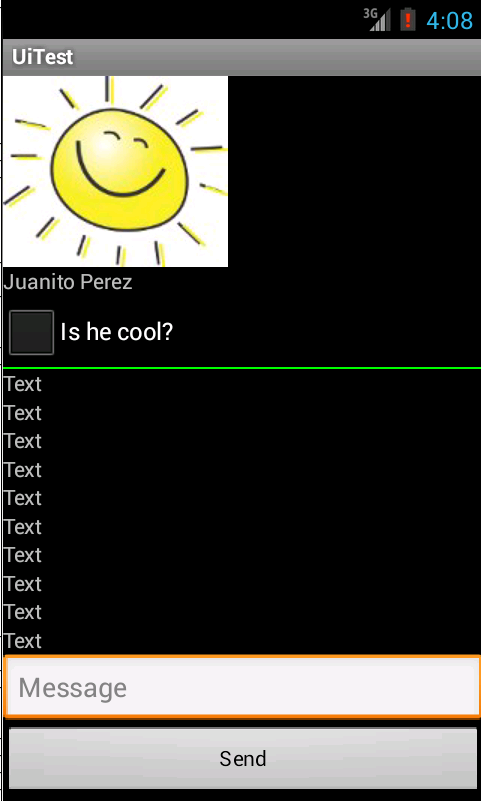
Now that we have all our elements lets try to put them where we want them. After a playing a little with the values I got to this code:
1
2
3
4
5
6
7
8
9
10
11
12
13
14
15
16
17
18
19
20
21
22
23
24
25
26
27
28
29
30
31
32
33
34
35
36
37
38
39
40
41
42
43
44
45
46
47
48
49
50
51
52
53
54
55
56
57
58
59
60
61
62
63
64
65
66
67
68
69
70
71
72
73
74
75
76
77
78
79
80
81
82
83
84
85
86
87
88
89
90
91
92
93
94
95
96
97
98
99
100
101
102
103
104
105
106
107
108
109
110
111
112
113
<?xml version="1.0" encoding="utf-8"?>
<RelativeLayout xmlns:android="http://schemas.android.com/apk/res/android"
        android:layout_height="fill_parent"
        android:layout_width="fill_parent"
        android:paddingLeft="10px"
        android:paddingTop="10px"
        android:paddingRight="10px"> <!-- Relative layout -->
    <ImageView android:id="@+id/image"
            android:layout_height="wrap_content"
            android:layout_width="wrap_content"
            android:src="@drawable/sun"/>
            <!-- By default the first element goes in the top left corner -->
    <TextView android:id="@+id/name"
            android:layout_width="wrap_content"
            android:layout_height="wrap_content"
            android:text="Juanito Perez"
            android:layout_toRightOf="@id/image"
            android:layout_marginTop="50px"
            android:layout_marginLeft="20px"/>
            <!-- toRightOf lets us place elements relative to others, in this
            case the image -->
            <!-- marginTop and marginLeft let us define margins -->
    <CheckBox android:id="@+id/cool"
            android:layout_width="wrap_content"
            android:layout_height="wrap_content"
            android:text="Is he cool?"
            android:layout_below="@id/name"
            android:layout_toRightOf="@id/image"
            android:layout_marginLeft="20px"/>
   <View android:id="@+id/ruler"
            android:layout_width="fill_parent"
            android:layout_height="1px"
            android:background="#FF00FF00"
            android:layout_below="@id/image"
            android:layout_marginTop="5px"
            android:layout_marginBottom="5px"/>
        <ScrollView android:id="@+id/scroller"
                android:layout_height="250px"
                android:layout_width="fill_parent"
                android:layout_below="@id/ruler"
                android:layout_marginBottom="5px">
        <!-- ScrollView allows us to scroll its content -->
            <LinearLayout android:layout_height="wrap_content"
                    android:layout_width="fill_parent"
                    android:orientation="vertical">
                <TextView android:layout_width="wrap_content"
                        android:layout_height="wrap_content"
                        android:text="Text"/>
                <TextView android:layout_width="wrap_content"
                        android:layout_height="wrap_content"
                        android:text="Text"/>
                <TextView android:layout_width="wrap_content"
                        android:layout_height="wrap_content"
                        android:text="Text"/>
                <TextView android:layout_width="wrap_content"
                        android:layout_height="wrap_content"
                        android:text="Text"/>
                <TextView android:layout_width="wrap_content"
                        android:layout_height="wrap_content"
                        android:text="Text"/>
                <TextView android:layout_width="wrap_content"
                        android:layout_height="wrap_content"
                        android:text="Text"/>
                <TextView android:layout_width="wrap_content"
                        android:layout_height="wrap_content"
                        android:text="Text"/>
                <TextView android:layout_width="wrap_content"
                        android:layout_height="wrap_content"
                        android:text="Text"/>
                <TextView android:layout_width="wrap_content"
                        android:layout_height="wrap_content"
                        android:text="Text"/>
                <TextView android:layout_width="wrap_content"
                        android:layout_height="wrap_content"
                        android:text="Text"/>
                <TextView android:layout_width="wrap_content"
                        android:layout_height="wrap_content"
                        android:text="Text"/>
                <TextView android:layout_width="wrap_content"
                        android:layout_height="wrap_content"
                        android:text="Text"/>
                <TextView android:layout_width="wrap_content"
                        android:layout_height="wrap_content"
                        android:text="Text"/>
                <TextView android:layout_width="wrap_content"
                        android:layout_height="wrap_content"
                        android:text="Text"/>
                <TextView android:layout_width="wrap_content"
                        android:layout_height="wrap_content"
                        android:text="Text"/>
                <TextView android:layout_width="wrap_content"
                        android:layout_height="wrap_content"
                        android:text="Text"/>
                <TextView android:layout_width="wrap_content"
                        android:layout_height="wrap_content"
                        android:text="Text"/>
            </LinearLayout>
        </ScrollView>
    <EditText android:id="@+id/message"
            android:layout_width="180px"
            android:layout_height="wrap_content"
            android:hint="Message"
            android:layout_below="@id/scroller"/>
    <Button android:id="@+id/send"
            android:layout_width="100px"
            android:layout_height="wrap_content"
            android:text="Send"
            android:layout_toRightOf="@id/message"
            android:layout_below="@id/scroller"/>
    <!-- We hardcoded some widths because RelativeLayout doesn't allow us to
    specify percentages. We could alternatively wrapped these two elements in a
    Linear layout and give them percentage weights -->
</RelativeLayout>
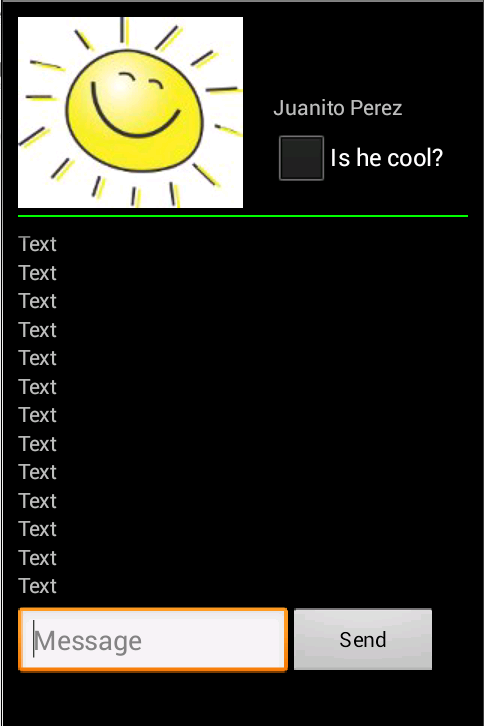
I added comments in the things I found more interesting. I ended with this screen:
android java mobile programming