There are three different types of menus that can be added to an Android app:
Action bar – For older devices this is the menu that you get when you click on the menu button on your device. Since most new devices don’t have this button anymore the recommended way to create this type of global menus is by using the action bar which is visible by default and located on the top of the screen.
Contextual action mode – This menu allows you to perform actions on selected elements. The contextual action bar can be found in the same place where the action bar was, but it only appears when elements are selected and actions can be performed against them.
Popup menu – This is a modal popup menu that should be used to perform actions related to the current view.
Action bar
To add an Action bar to your app the only thing you need to do is to use the Theme.Holo theme, which is the default theme when targetSdkVersion or minSdkVersion are set to 11 or greater. You can specify this in your AndroidManifest.xml file:
1
2
3
4
<manifest ... >
    <uses-sdk android:targetSdkVersion="11" />
    ...
</manifest>
The next thing you might want do to is add action items (buttons that perform actions) to your action bar. To do this first you need to create a menu resource file (under res/menu/). I will call mine main.xml
1
2
3
4
5
6
7
8
9
<?xml version="1.0" encoding="utf-8"?>
<menu xmlns:android="http://schemas.android.com/apk/res/android">
    <item android:id="@+id/item_one" android:title="Item one"
          android:showAsAction="ifRoom"/>
    <item android:id="@+id/item_two" android:title="Item two"
          android:showAsAction="ifRoom"/>
    <item android:id="@+id/item_three" android:title="Item three"
          android:showAsAction="ifRoom"/>
</menu>
I defined a menu with three items. Specifying android:showAsAction attribute as ifRoom tells android to try to show the menu item if there is room in the action bar. If there is no room the items will appear when you click the hardware menu button or the expand button on the action bar. This is how it looks in the simulator:
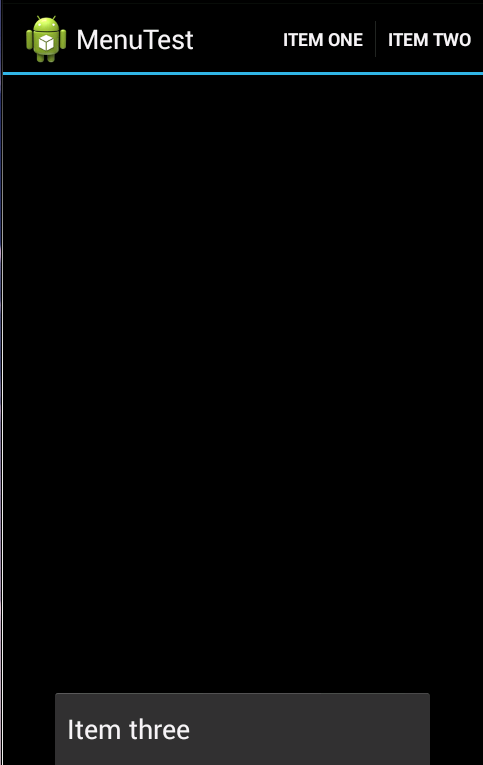
Item one and Item two are shown in the action bar because they fit there. Item three is only shown when the hardware button is clicked.
Now, to actually add the menus to your application you need to add this code to your activity:
1
2
3
4
5
6
7
@Override
public boolean onCreateOptionsMenu(Menu menu)
{
    MenuInflater inflater = getMenuInflater();
    inflater.inflate(R.menu.main, menu);
    return true;
}
I am using R.menu.main because I named my menu main.xml, if you used a different name make sure you change it here too.
For more information: Android Action Bar Documentation.
Contextual Action Mode
Because this menu is only shown when an element or group of elements is selected first we need to have some elements in our view. I will add a check box to a view and have a contextual action mode menu pop when it is selected and go away when it is not. First lets add our check box:
1
2
3
4
5
6
7
8
9
10
<?xml version="1.0" encoding="utf-8"?>
<RelativeLayout xmlns:android="http://schemas.android.com/apk/res/android"
       android:layout_height="fill_parent"
       android:layout_width="fill_parent">
    <CheckBox android:id="@+id/checkbox_one"
       android:layout_width="wrap_content"
       android:layout_height="wrap_content"
       android:text="Checkbox one"
       android:onClick="checkboxOneClicked"/>
</RelativeLayout>
Now I’ll create the new menu on res/menu/checkbox.xml:
1
2
3
4
5
<?xml version="1.0" encoding="utf-8"?>
<menu xmlns:android="http://schemas.android.com/apk/res/android">
    <item android:id="@+id/item_delete" android:title="Delete"
          android:showAsAction="ifRoom"/>
</menu>
The way you build this type of menus is the same as for Action Bar menus. The next step is to tell our app that we want to show this menu when our check box is selected:
1
2
3
4
5
6
7
8
9
10
11
12
13
14
15
16
17
18
19
20
21
22
23
24
25
26
27
28
29
30
31
32
33
34
35
36
37
38
39
40
41
42
43
44
45
46
47
48
49
50
51
52
53
54
55
56
public class UiTest extends Activity
{
    // This is our action menu
    public ActionMode mActionMode;

    // .. Some code hidden

    public void checkboxOneClicked(View view)
    {
        boolean checked = ((CheckBox) view).isChecked();
        if (checked) {
            // Instantiate (show) our menu
            mActionMode = this.startActionMode(mActionModeCallback);
            view.setSelected(true);
        } else {
            // Kill the menu
            mActionMode.finish();
            view.setSelected(false);
        }
    }

    private ActionMode.Callback mActionModeCallback = new ActionMode.Callback()
    {
        // The four methods of the interface need to be implemented

        @Override
        public boolean onCreateActionMode(ActionMode mode, Menu menu)
        {
            // Inflate and show the menu
            MenuInflater inflater = mode.getMenuInflater();
            inflater.inflate(R.menu.checkbox, menu);
            return true;
        }

        @Override
        public void onDestroyActionMode(ActionMode mode)
        {
            // Set our menu to null
            mActionMode = null;
        }

        @Override
        public boolean onActionItemClicked(ActionMode mode, MenuItem item)
        {
            // This is executed when a menu item is clicked, here is where
            // fancy logic would be added
            return false;
        }

        @Override
        public boolean onPrepareActionMode(ActionMode mode, Menu menu)
        {
            return false;
        }
    };
}
Now when you click on the check box you will see something like this:

Popup menu
Let’s create a resource for our popup menu:
1
2
3
4
5
<?xml version="1.0" encoding="utf-8"?>
<menu xmlns:android="http://schemas.android.com/apk/res/android">
    <item android:id="@+id/item_do_something" android:title="Do something"/>
    <item android:id="@+id/item_more" android:title="More"/>
</menu>
The menu can be triggered from any action executed from any view. To save some time I will reuse the check box from my previous example and modify the definition of checkboxOneClicked:
1
2
3
4
5
6
7
public void checkboxOneClicked(View view)
{
    PopupMenu popup = new PopupMenu(this, view);
    MenuInflater inflater = popup.getMenuInflater();
    inflater.inflate(R.menu.popup, popup.getMenu());
    popup.show();
}
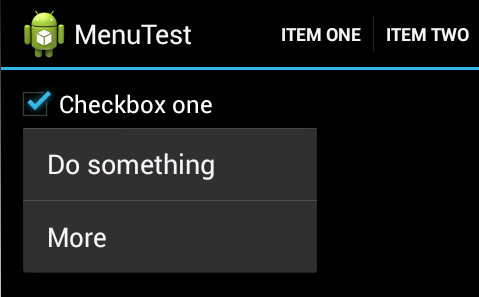
Here we are telling the app to show our popup menu on the check box every time it is clicked. The final result looks like this:
android java mobile programming