I have been playing with 2D graphics in Android and it was a little hard to understand how to do some things that I needed. The API documentation for some functions doesn’t really do much of explaining you exactly what each argument does and how you can use them. After a little research I was able to draw everything I needed so I am going to try to summarize what I learned.
Paint
Most of the drawing functions on Android will take a Paint object as an argument. To use it you just need to instantiate the Paint class:
1
Paint p = new Paint();
You can specify one of three drawing styles: FILL, FILL_AND_STROKE, STROKE. In a very simple scenario you might want to fill a shape using a blue color, and you could do it like this:
1
2
3
Paint p = new Paint();
p.setStyle(Paint.Style.FILL);
p.setColor(Color.BLUE);
Gradients
There will be many cases where you will want to fill a shape with a gradient. To do this you need to use the setShader function which allows you to specify gradients in many different ways. A common scenario would be to use a linear gradient to fill a shape, for this, we use the LinearGradient class:
1
LinearGradient(float x0, float y0, float x1, float y1, int[] colors, float[] positions, Shader.TileMode tile)
The first four arguments are points where you want your gradient to start and end. The fifth argument is and array of colors you want to use for your gradient. The sixth argument is the color stops of your gradient; the range goes from 0, meaning in the beginning of your gradient, to 1, meaning the end. The last argument specifies how the gradient will tile if the shape is bigger than the gradient you are creating. Here is an example of how to create a circle with a gradient fill:
1
2
3
4
5
6
7
8
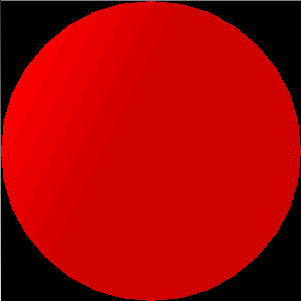
Paint p = new Paint();
p.setStyle(Paint.Style.FILL);
int darkRed = Color.argb(255, 204, 0 , 0);
int colors[] = { darkRed, Color.RED, darkRed };
float positions[] = { 0, 0.2f, 0.6f };
LinearGradient g = new LinearGradient(0, 0, 100, 50, colors, positions, TileMode.CLAMP);
p.setShader(g);
canvas.drawCircle(200, 200, 100, p);
And this is how it looks like:
Drawing polygons
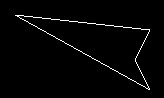
Paths allow you to specify different points that delimit your polygon. You can use moveTo to specify where you want to start your drawing, then you can use lineTo to draw a line from that point and when you are done you can use close, to close your polygon:
1
2
3
4
5
6
7
8
9
10
Paint p = new Paint();
p.setStyle(Paint.Style.STROKE);
p.setColor(Color.WHITE);
Path path = new Path();
path.moveTo(10, 10);
path.lineTo(100, 20);
path.lineTo(90, 40);
path.lineTo(100, 60);
path.close();
canvas.drawPath(path, p);
Gives this result:
Anti aliasing
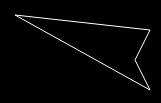
You can see in the previous example that by default diagonal lines don’t look very pretty. You can easily fix this by applying anti alias to your paint:
1
p.setAntiAlias(true);
This is how the polygon looks like after applying anti-alias:
Arcs
Arcs can be used to draw sections of an oval or any curve lines. The reason I am writing about them is because it is not obvious to understand what the arguments of drawArc are by just reading the documentation.
1
drawArc(RectF oval, float startAngle, float sweepAngle, boolean useCenter, Paint paint)
This is what the documentation says about the arguments:
- oval – The bounds of oval used to define the shape and size of the arc
- startAngle – Starting angle (in degrees) where the arc begins
- sweepAngle – Sweep angle (in degrees) measured clockwise
- useCenter – If true, include the center of the oval in the arc, and close it if it is being stroked. This will draw a wedge
- paint – The paint used to draw the arc
It doesn’t seem that confusing, but the first time I tried to use it I go something unexpected:
1
2
3
4
5
Paint p = new Paint();
p.setAntiAlias(true);
p.setStyle(Paint.Style.STROKE);
p.setColor(Color.WHITE);
canvas.drawArc(new RectF(10, 10, 200, 150), 0, 90, false, p);

As you can see, I specified to start at 0 degrees and sweep for 90 degrees. This is not what I expected because I usually start counting from the left. So, when you want to draw an arc in Android you need to keep this in mind. To get the result I expected I should have used:
1
canvas.drawArc(new RectF(10, 10, 200, 150), 180, 90, false, p);

It is also useful to know (specially when drawing arcs as part of a path) that you can also specify negative degrees, so I can get the same result using this:
1
canvas.drawArc(new RectF(10, 10, 200, 150), -90, -90, false, p);
android java mobile programming