Web components is a series of W3C specs that aim to give web developers the power to create custom reusable components. The specs that form part of the web components framework are: HTML templates, custom elements, shadow DOM and HTML imports. Together these standards give us the power to create, load and use custom components.
HTML Templates
HTML Templates allow you to specify templates that you can later reference with JS and insert where you see fit. Templates are an alternative to writing HTML strings inside your JS code. Instead of having to concatenate a bunch of strings to form an html snippet now you can write it in HTML inside a template tag and then just use its content.
The template tag is only intended to save a template for later use, for that reason it doesn’t render anything in the browser and its content is not available for scripting until you add its content to a DOM element.
It’s most simple use would be to create a template and insert its content into another element. Lets start with this HTML:
1
2
3
4
5
6
7
8
<html>
<body>
  <template>
    <p>Click the button</p>
    <button>Click me</button>
  </template>
</body>
</html>
Now we can use this template to create another element:
1
2
3
4
var template = document.getElementsByTagName('template')[0];
var div = document.createElement('DIV');
div.appendChild(template.content.cloneNode(true));
document.body.appendChild(div);
As you would expect, the content of the template will be appended to the body:

Once you have cloned the template you can use JS to modify the structure, attach event listeners or do whatever you need.
Custom elements
If you have used Angular, you are familiar with creating new elements. They call them directives. If you are not familiar, it doesn’t matter. Custom elements are just custom tags that look and behave in a similar way. The way they look and behave is defined by the creator of the custom tag, which will most likely be you.
When creating custom elements you have to keep in mind two restrictions about their names:
- Must contain a -(dash)
- Must not contain uppercase characters
This is enough information to start using crazy tags all over the place:
1
2
3
4
5
6
<html>
<body>
  <adrian-title>Hello</adrian-title>
  <adrian-body>Some text</adrian-body>
</body>
</html>
This works, but is not very useful, something more useful would probably be:
1
2
3
4
5
6
7
8
9
10
11
12
13
14
<adr-accordion>
  <adr-item active>
    <adr-title>Some title</adr-title>
    <adr-content>
      Some content
    </adr-content>
  </adr-item>
  <adr-item>
    <adr-title>Another title</adr-title>
    <adr-content>
      Content for other section
    </adr-content>
  </adr-item>
</adr-accordion>
From looking at this HTML we can easily guess what it does. It is an accordion and the first item is active when it is rendered for the first time. Even though it makes sense for us by looking at it, the browser doesn’t really know how to render it:

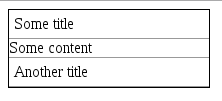
We can fix the way it looks with CSS:
1
2
3
4
5
6
7
8
9
10
11
12
13
14
15
16
17
18
19
20
21
adr-accordion {
  width: 200px;
  border: 1px solid #000;
  display: block;
}

adr-accordion adr-title {
  border-bottom: 1px solid #999;
  margin: 0;
  padding: 5px;
  display: block;
}

adr-accordion adr-content {
  display: none;
}

adr-accordion adr-item[active] adr-content {
  display: block;
  border-bottom: 1px solid #999;
}
It now looks a little better:
But it still doesn’t work like an accordion. To make it behave like an accordion we will create a custom element with custom functionality:
1
2
3
4
5
6
7
8
9
10
11
12
13
14
15
16
17
18
19
20
21
22
23
24
// Create a prototype for all accordions
var AdrAccordionProto = Object.create(HTMLElement.prototype);

// Execute this every time a new adr-accordion is attached to the DOM. This will
// execute also for adr-accordion that were already in the DOM.
AdrAccordionProto.attachedCallback = function() {
  // Add an event listener to each title
  var titles = this.getElementsByTagName('adr-title');
  for (var i = 0; i < titles.length; i++) {
    titles[i].addEventListener('click', function() {
      // Unset whichever item was active before
      for (var i = 0; i < titles.length; i++) {
        titles[i].parentNode.removeAttribute('active');
      }

      // Set this item to active
      this.parentNode.setAttribute('active', 'active');
    });
  }
};

var AdrAccordion = document.registerElement('adr-accordion', {
  prototype: AdrAccordionProto
});
Now we have an accordion. It works and behaves like an accordion. If you add a new adr-accordion to the DOM it will automatically get the look and functionality.
It is kind of cool, but it is not bullet-proof. Even though our element name is named-spaced, someone can still overwrite the CSS if the wanted(or by accident if there was a name crash). The same thing goes for the functionality. Shadow DOM helps us keep our custom elements the way we want them to be.
Shadow DOM
We have now created a custom element. The next step is to isolate it from the outside world using shadow DOM. Shadow DOM works by creating a shadow root inside of an element. When you add a shadow root to an element, the element becomes a shadow host and starts behaving differently. When you add a shadow root to and element, it will render whatever DOM structure is inside the shadow root and not what was actually inserted in the document. For example:
1
2
3
4
5
6
7
8
<html>
<body>
<div id="hello">Hello</div>
<script>
  document.getElementById('hello').createShadowRoot();
</script>
</body>
</html>
We would expect to see the text “Hello” in the screen, but instead we see nothing:
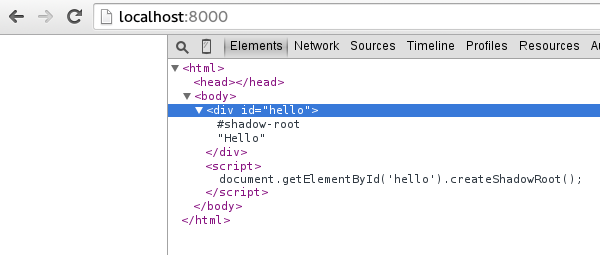
Even when the DOM inspector shows our div with Hello inside of it, it is not rendered because it is not part of the shadowRoot. There are a few ways we can move content from the outside to the shadowRoot. The simplest one would be using insertion points:
1
2
3
4
5
6
7
8
9
10
11
12
13
<html>
<body>
<div id="hello">Hello</div>
<template id="template">
  <p>Message for you: <content></content></p>
</template>
<script>
  var root = document.getElementById('hello').createShadowRoot();
  var template = document.getElementById('template');
  root.appendChild(template.content.cloneNode(true));
</script>
</body>
</html>
Which gives this result:
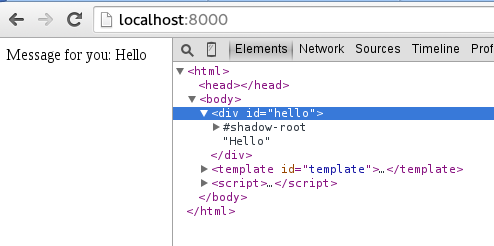
There are some more advanced things that you can do with insertion points, but when you need more power, you can always use JS do manipulate the DOM.
The utility of shadow DOM is not only in hiding the HTML to the user, but also in isolating CSS:
1
2
3
4
5
6
7
8
9
10
11
12
13
14
15
16
17
18
19
20
21
22
23
24
25
26
27
28
<html>
<body>
<style>
body p {
  border: 5px solid #f00;
}

div {
  border: 1px solid #0f0;
}
</style>
<div id="hello">Hello</div>
<p>I'm just a text</p>
<template id="template">
  <style>
  p {
    border: 2px solid #00f;
  }
  </style>
  <p>Message for you: <content></content></p>
</template>
<script>
  var root = document.getElementById('hello').createShadowRoot();
  var template = document.getElementById('template');
  root.appendChild(template.content.cloneNode(true));
</script>
</body>
</html>
The resulting page looks like this:
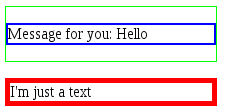
Lets understand what is happening. First we see a green border surrounding our component. This is the border we are setting on all div elements on the document. When we use an insertion point, we grab all the content inside the hello element, but it is still a div from the outside so it will still be affected by the style definitions in the document.
Then we see that the paragraph inside our shadowed element has a blue border. Notice that even when the “body p” style definition has higher specificity than the one inside the template, the border is still blue. This is because the elements inside of the shadow DOM can only be styled from inside the shadow DOM.
Finally, you see a paragraph with a red border. This paragraph lives outside our custom element and for that reason follows the styles defined in the document.
Lets make a slight change and notice what happens:
1
2
3
4
5
6
7
8
9
10
11
12
13
14
15
16
17
18
19
20
21
22
23
24
25
26
27
28
<html>
<body>
<style>
body p {
  border: 5px solid #f00;
}

div {
  border: 1px solid #0f0;
}
</style>
<div id="hello">Hello <p>world</p></div>
<p>I'm just a text</p>
<template id="template">
  <style>
  p {
    border: 2px solid #00f;
  }
  </style>
  <p>Message for you: <content></content></p>
</template>
<script>
  var root = document.getElementById('hello').createShadowRoot();
  var template = document.getElementById('template');
  root.appendChild(template.content.cloneNode(true));
</script>
</body>
</html>
I changed the message from “Hello” to “Hello <p>world</p>”. Lets see the result:
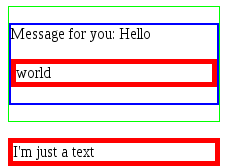
You might have expected “world” to have a blue border(at least that is what I expected). Instead it has a blue border. This is because elements added to the shadowRoot using insertion points will also be affected by styles from the outside.
Now that we know how the shadow DOM works, lets create an accordion that will look an behave correctly regardless of the environment:
1
2
3
4
5
6
7
8
9
10
11
12
13
14
15
16
17
18
19
20
21
22
23
24
25
26
27
28
29
30
31
32
33
34
35
36
37
38
39
40
41
42
43
44
45
46
47
48
49
50
51
52
53
54
55
56
57
58
59
60
61
62
63
64
65
66
67
68
69
70
71
72
73
74
75
76
77
78
79
80
81
82
83
84
85
86
87
88
89
90
91
92
93
94
95
96
97
98
99
100
101
102
103
104
<html>
<body>
<!-- Web components interface to the outside world. This is what a user of the
web components would write -->
<adr-accordion>
  <adr-item active>
    <adr-title>Some title</adr-title>
    <adr-content>
      Some content
    </adr-content>
  </adr-item>
  <adr-item>
    <adr-title>Another title</adr-title>
    <adr-content>
      Content for other section
    </adr-content>
  </adr-item>
</adr-accordion>

<!-- Template that will be added to the shadow dom -->
<template id="adr-accordion-template">
<!-- Shadow styles. These styles apply only to the shadow DOM. They don't
affect the outside -->
<style>
#accordion {
  width: 200px;
  border: 1px solid #000;
  display: block;
}

#accordion h2 {
  border-bottom: 1px solid #999;
  margin: 0;
  padding: 5px;
  display: block;
}

#accordion .content {
  display: none;
}

#accordion .active .content {
  display: block;
  border-bottom: 1px solid #999;
}
</style>

<!-- Element where the accordion will be built -->
<div id="accordion"></div>
</template>
<script>
// Create a prototype for all accordions
var AdrAccordionProto = Object.create(HTMLElement.prototype);

// Execute this every time a new adr-accordion is attached to the DOM. This will
// execute also for adr-accordion that were already in the DOM.
AdrAccordionProto.attachedCallback = function() {
  var root = this.createShadowRoot();
  var template = document.getElementById('adr-accordion-template');
  var shadowTree = template.content.cloneNode(true);

  // Build shadow tree based on element tree
  var accordion = shadowTree.getElementById('accordion');
  var titles = this.getElementsByTagName('adr-title');
  var contents = this.getElementsByTagName('adr-content');
  var first = true;
  var item;
  for (var i = 0; i < titles.length; i++) {
    item = document.createElement('div');
    item.className = 'item';
    if (first) {
      item.className += ' active';
      first = false;
    }
    item.innerHTML = '<h2>' + titles[i].innerHTML + '</h2>' +
        '<div class="content">' + contents[i].innerHTML + '</div>';
    accordion.appendChild(item);
  }

  // Add click listener to shadowTree
  accordion.addEventListener('click', function(e) {
    var target = e.target;
    if (target.tagName !== 'H2') {
      return;
    }

    var items = accordion.getElementsByClassName('item');

    for (var i = 0; i < items.length; i++) {
      items[i].className = 'item';
    }

    target.parentNode.className = 'item active';
  });

  root.appendChild(shadowTree);
};

var AdrAccordion = document.registerElement('adr-accordion', {
  prototype: AdrAccordionProto
});
</script>
</body>
</html>
This might look like a lot of code, but keep in mind that from now on the user of your components only needs to import your component and then she will be able to create accordions using the html interface. Now lets look at how we can distribute our components:
HTML imports
We have now created an accordion that can be reused in different environments because it doesn’t pollute the CSS or JS space. Now we need a way to distribute our web component so people can start using it.
HTML imports are very simple to use. First lets move our component code to its own file with just some small changes:
1
2
3
4
5
6
7
8
9
10
11
12
13
14
15
16
17
18
19
20
21
22
23
24
25
26
27
28
29
30
31
32
33
34
35
36
37
38
39
40
41
42
43
44
45
46
47
48
49
50
51
52
53
54
55
56
57
58
59
60
61
62
63
64
65
66
67
68
69
70
71
72
73
74
75
76
77
78
79
80
81
82
83
84
85
86
87
88
89
90
<html>
<body>
<!-- Template that will be added to the shadow dom -->
<template id="adr-accordion-template">
<!-- Shadow styles. These styles apply only to the shadow DOM. They don't
affect the outside -->
<style>
#accordion {
  width: 200px;
  border: 1px solid #000;
  display: block;
}

#accordion h2 {
  border-bottom: 1px solid #999;
  margin: 0;
  padding: 5px;
  display: block;
}

#accordion .content {
  display: none;
}

#accordion .active .content {
  display: block;
  border-bottom: 1px solid #999;
}
</style>

<!-- Element where the accordion will be built -->
<div id="accordion"></div>
</template>
<script>
// Get this document
var doc = document.currentScript.ownerDocument;

// Create a prototype for all accordions
var AdrAccordionProto = Object.create(HTMLElement.prototype);

// Execute this every time a new adr-accordion is attached to the DOM. This will
// execute also for adr-accordion that were already in the DOM.
AdrAccordionProto.attachedCallback = function() {
  var root = this.createShadowRoot();
  var template = doc.getElementById('adr-accordion-template');
  var shadowTree = template.content.cloneNode(true);

  // Build shadow tree based on element tree
  var accordion = shadowTree.getElementById('accordion');
  var titles = this.getElementsByTagName('adr-title');
  var contents = this.getElementsByTagName('adr-content');
  var first = true;
  var item;
  for (var i = 0; i < titles.length; i++) {
    item = doc.createElement('div');
    item.className = 'item';
    if (first) {
      item.className += ' active';
      first = false;
    }
    item.innerHTML = '<h2>' + titles[i].innerHTML + '</h2>' +
        '<div class="content">' + contents[i].innerHTML + '</div>';
    accordion.appendChild(item);
  }

  // Add click listener to shadowTree
  accordion.addEventListener('click', function(e) {
    var target = e.target;
    if (target.tagName !== 'H2') {
      return;
    }

    var items = accordion.getElementsByClassName('item');

    for (var i = 0; i < items.length; i++) {
      items[i].className = 'item';
    }

    target.parentNode.className = 'item active';
  });

  root.appendChild(shadowTree);
};

var AdrAccordion = document.registerElement('adr-accordion', {
  prototype: AdrAccordionProto
});
</script>
</body>
</html>
The most important change happens on line 36. The loaded HTML file is not automatically included into the page(document) context. Instead it has its own document context that you can get using document.currentScript.ownerDocument. This is important because on line 45 I try to access the template declared in this document. If I tried to do document.getElementById(‘adr-accordion-template’); I would get an error because that element doesn’t exist in the page context. Everything else works pretty much the same way. Now we only need to use it:
1
2
3
4
5
6
7
8
9
10
11
12
13
14
15
16
17
18
19
<html>
<body>
<link rel="import" href="component.html">
<adr-accordion>
  <adr-item active>
    <adr-title>Some title</adr-title>
    <adr-content>
      Some content
    </adr-content>
  </adr-item>
  <adr-item>
    <adr-title>Another title</adr-title>
    <adr-content>
      Content for other section
    </adr-content>
  </adr-item>
</adr-accordion>
</body>
</html>
And that’s it for now. We created a reusable web component. There is a lot of things that I didn’t cover, but I think this is good to get you started.
design_patterns javascript programming