In a previous post I explained how to create a navigation bar for your Android app. I’m going to build on top of that example a drawer where we can put other options for the user.
Android provides a Drawer Layout that was specifically created for this purpose. Since we are going to be adding the drawer to my previous example lets first look at how the original looks:
1
2
3
4
5
6
7
8
9
10
11
12
13
14
15
16
17
18
19
20
21
22
23
24
25
26
27
28
29
30
31
32
33
34
<?xml version="1.0" encoding="utf-8"?>
<LinearLayout
  xmlns:android="http://schemas.android.com/apk/res/android"
  android:layout_width="fill_parent"
  android:layout_height="wrap_content"
  android:orientation="vertical">
  <LinearLayout
    android:layout_width="match_parent"
    android:layout_height="40dip"
    android:orientation="horizontal">
    <ImageButton
    android:layout_height="match_parent"
    android:layout_weight="1"
    android:layout_width="wrap_content"
    android:src="@drawable/ic_add_black_24dp"
    style="@style/NavButton" />
    <ImageButton
    android:layout_height="match_parent"
    android:layout_weight="1"
    android:layout_width="wrap_content"
    android:src="@drawable/ic_people_black_24dp"
    style="@style/NavButton" />
    <ImageButton
    android:layout_height="match_parent"
    android:layout_weight="1"
    android:layout_width="wrap_content"
    android:src="@drawable/ic_menu_black_24dp"
    style="@style/NavButton" />
  </LinearLayout>
  <LinearLayout android:layout_height="1dip"
    android:layout_width="match_parent"
    android:background="#000">
  </LinearLayout>
</LinearLayout>
And after adding the drawer:
1
2
3
4
5
6
7
8
9
10
11
12
13
14
15
16
17
18
19
20
21
22
23
24
25
26
27
28
29
30
31
32
33
34
35
36
37
38
39
40
41
42
43
44
45
46
47
48
49
50
51
52
53
54
55
<?xml version="1.0" encoding="utf-8"?>
<android.support.v4.widget.DrawerLayout
    xmlns:android="http://schemas.android.com/apk/res/android"
    android:id="@+id/drawer_layout"
    android:layout_width="match_parent"
    android:layout_height="match_parent">
  <LinearLayout
      xmlns:android="http://schemas.android.com/apk/res/android"
      android:layout_width="fill_parent"
      android:layout_height="wrap_content"
      android:orientation="vertical">
    <LinearLayout
        android:layout_width="match_parent"
        android:layout_height="40dip"
        android:orientation="horizontal">
      <ImageButton
        android:layout_height="match_parent"
        android:layout_weight="1"
        android:layout_width="wrap_content"
        android:src="@drawable/ic_add_black_24dp"
        style="@style/NavButton" />
      <ImageButton
        android:layout_height="match_parent"
        android:layout_weight="1"
        android:layout_width="wrap_content"
        android:src="@drawable/ic_people_black_24dp"
        style="@style/NavButton" />
      <ImageButton
        android:layout_height="match_parent"
        android:layout_weight="1"
        android:layout_width="wrap_content"
        android:src="@drawable/ic_menu_black_24dp"
        style="@style/NavButton" />
    </LinearLayout>
    <LinearLayout
        android:layout_height="1dip"
        android:layout_width="match_parent"
        android:background="#000">
    </LinearLayout>
  </LinearLayout>
  <LinearLayout
      android:id="@+id/drawer"
      android:layout_width="300dp"
      android:layout_height="match_parent"
      android:layout_gravity="right"
      android:background="#fff"
      android:clickable="true"
      android:importantForAccessibility="no"
      android:orientation="vertical">
    <TextView
        android:layout_height="match_parent"
        android:layout_width="wrap_content"
        android:text="hello" />
  </LinearLayout>
</android.support.v4.widget.DrawerLayout>
A few important things: In line 2 you can see that we are wrapping everything inside a android.support.v4.widget.DrawerLayout. This takes care of most of the magic. We have two LinearLayouts inside the drawer; One starting at line 7 and the other at line 41. Line 43 specifies how wide the drawer will be when opened. Line 45 makes the drawer appear from the right as opposed to from the left. Line 47 prevents click events on top of the drawer to leak to the view behind.
Now we have a drawer in our app, but the only way to open it is by swiping from the right edge of the screen to the left:
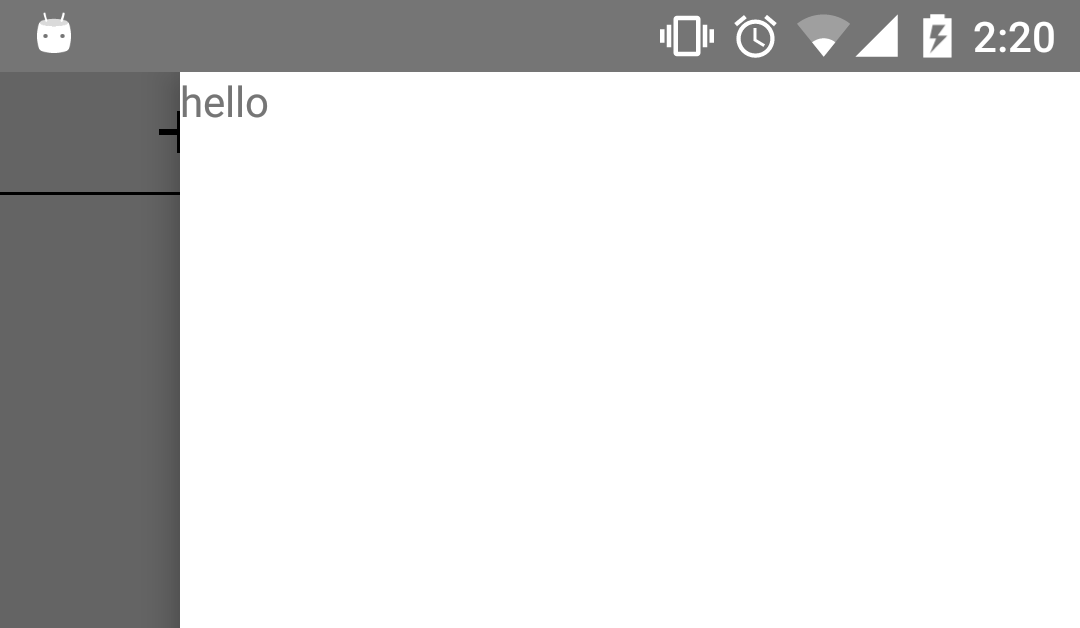
What we want is to make it appear also when the navigation button is clicked:

To do this we just need to call openDrawer in the DrawerLayout. Something like this would suffice:
1
2
DrawerLayout drawerLayout = (DrawerLayout)findViewById(R.id.drawer_layout);
drawerLayout.openDrawer(findViewById(R.id.drawer));
Now, lets add a real item to our drawer:
1
2
3
4
5
6
7
8
9
10
11
12
13
14
15
16
17
18
19
20
21
22
23
24
25
26
27
28
29
30
31
32
33
34
...
<LinearLayout
android:id="@+id/drawer"
android:layout_width="300dp"
android:layout_height="match_parent"
android:layout_gravity="right"
android:background="#fff"
android:clickable="true"
android:importantForAccessibility="no"
android:orientation="vertical">
<LinearLayout
android:id="@+id/revoke_access_button"
android:layout_height="wrap_content"
android:layout_width="match_parent"
android:clickable="true"
android:gravity="center_vertical"
android:background="?attr/selectableItemBackground"
android:orientation="horizontal">
<ImageView
android:layout_height="wrap_content"
android:layout_width="wrap_content"
android:layout_margin="10dip"
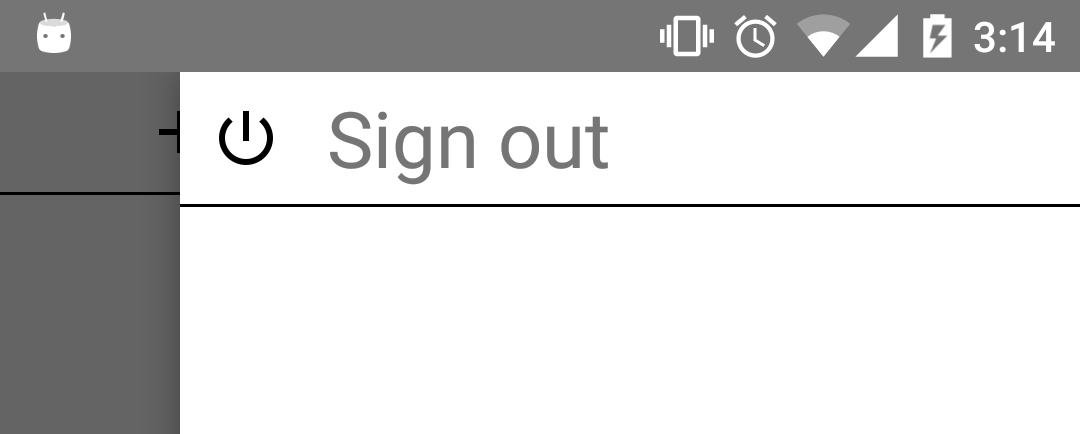
android:src="@drawable/ic_power_settings_new_black_24dp" />
<TextView
android:layout_weight="1"
android:text="Sign out"
android:layout_width="wrap_content"
android:textSize="26sp"
android:paddingLeft="5dip"
android:layout_height="wrap_content" />
</LinearLayout>
<LinearLayout style="@style/Separator" />
</LinearLayout>
...
Lines 15 and 17 above are important to make this item clickable and have a ripple effect. The end result will be something like this:
From here it should be easy to customize the drawer to make it do whatever you desire.
android java mobile programming projects