I finished building a hobby app a few weeks ago, but after getting all the functionality right I couldn’t help but notice that it looked horrible. I’m going to slowly try to make it less ugly starting with this post.
The first thing that I want to do is get rid of the default title bar because it occupies too much space:
Create the file src/main/res/values/style.xml if it doesn’t exist already and create a new theme with no title:
1
2
3
4
5
6
<?xml version="1.0" encoding="UTF-8" ?>
<resources>
  <style name="NewTheme" parent="android:Theme.Holo.Light">
    <item name="android:windowNoTitle">true</item>
  </style>
</resources>
We create a new theme that extends the light theme of Android and overwrites the windowNoTitle property. Now we need to apply this theme to our application from our manifest:
1
2
3
4
5
6
7
8
9
10
11
12
13
14
15
16
17
<?xml version="1.0" encoding="utf-8"?>
<manifest xmlns:android="http://schemas.android.com/apk/res/android"
        package="com.example.app"
        android:versionCode="1"
        android:versionName="0.0.1">
    <uses-sdk android:minSdkVersion="9" android:targetSdkVersion="21" />

    <application android:label="@string/app_name"
        android:theme="@style/NewTheme" >
        <activity android:name="Main" android:label="@string/app_name">
            <intent-filter>
                <action android:name="android.intent.action.MAIN" />
                <category android:name="android.intent.category.LAUNCHER" />
            </intent-filter>
        </activity>
    </application>
</manifest>
Line 9 assigns the theme to the application. The app doesn’t have a title bar anymore:
The next step I would recommend is to grab some icons from the material icon library depending on what items you want in your navigation bar. After grabbing some icons you can use ImageButton to create the navigation bar. This is how my res/layout/main.xml looks like:
1
2
3
4
5
6
7
8
9
10
11
12
13
14
15
16
17
18
19
20
21
22
23
24
25
26
<?xml version="1.0" encoding="utf-8"?>
<LinearLayout
    xmlns:android="http://schemas.android.com/apk/res/android"
    android:layout_width="fill_parent"
    android:layout_height="wrap_content"
    android:orientation="vertical">
  <LinearLayout android:layout_width="match_parent"
      android:layout_height="40dip"
      android:orientation="horizontal">
    <ImageButton
      android:layout_height="match_parent"
      android:layout_weight="1"
      android:layout_width="wrap_content"
      android:src="@drawable/ic_add_black_24dp" />
    <ImageButton
      android:layout_height="match_parent"
      android:layout_weight="1"
      android:layout_width="wrap_content"
      android:src="@drawable/ic_people_black_24dp" />
    <ImageButton
      android:layout_height="match_parent"
      android:layout_weight="1"
      android:layout_width="wrap_content"
      android:src="@drawable/ic_menu_black_24dp" />
  </LinearLayout>
</LinearLayout>
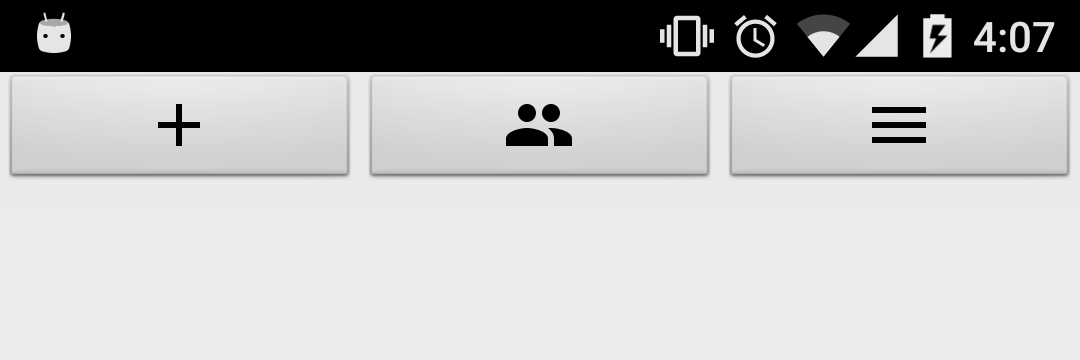
So far it is a simple LinearLayout containing three ImageButtons with icons from the google material library. I set the height of the LinearLayout to 40dip because this is the height I want for my navigation bar, this can be adjusted as needed. This is the result:
It’s starting to look better. Lets make the buttons flat and add a border so it looks more like a navigation bar:
1
2
3
4
5
6
7
8
9
10
11
12
13
14
15
16
17
18
19
20
21
22
23
24
25
26
27
28
29
30
31
32
33
34
<?xml version="1.0" encoding="utf-8"?>
<LinearLayout
    xmlns:android="http://schemas.android.com/apk/res/android"
    android:layout_width="fill_parent"
    android:layout_height="wrap_content"
    android:orientation="vertical">
  <LinearLayout
      android:layout_width="match_parent"
      android:layout_height="40dip"
      android:orientation="horizontal">
    <ImageButton
      android:layout_height="match_parent"
      android:layout_weight="1"
      android:layout_width="wrap_content"
      android:src="@drawable/ic_add_black_24dp"
      style="?android:attr/borderlessButtonStyle" />
    <ImageButton
      android:layout_height="match_parent"
      android:layout_weight="1"
      android:layout_width="wrap_content"
      android:src="@drawable/ic_people_black_24dp"
      style="?android:attr/borderlessButtonStyle" />
    <ImageButton
      android:layout_height="match_parent"
      android:layout_weight="1"
      android:layout_width="wrap_content"
      android:src="@drawable/ic_menu_black_24dp"
      style="?android:attr/borderlessButtonStyle" />
  </LinearLayout>
  <LinearLayout android:layout_height="1dip"
      android:layout_width="match_parent"
      android:background="#000">
  </LinearLayout>
</LinearLayout>
To make the buttons flat we added this attribute to all the buttons:
1
style="?android:attr/borderlessButtonStyle"
The easiest way I found to add a border to the navigation was by adding a view below it with a background color. All together gives this result:
It looks very good now, but it doesn’t have those cool ripple effects that material buttons usually have. For getting that effect we need to use the AppCompat.Light theme. First we need to add appcompat as a dependency in build.gradle:
1
compile 'com.android.support:appcompat-v7:23.1.0'
Then you need to change the theme definition to use the AppCompat theme:
1
2
3
4
5
6
<?xml version="1.0" encoding="UTF-8" ?>
<resources>
  <style name="NewTheme" parent="Theme.AppCompat.Light">
    <item name="windowNoTitle">true</item>
  </style>
</resources>
And then have your activity extend AppCompatActivity:
1
2
3
4
5
6
7
...

import android.support.v7.app.AppCompatActivity;

public class Main extends AppCompatActivity {
  ...
}
This adds the ripple effect to the buttons, but causes the buttons to not occupy all the space available. You can fix this by giving them some negative margin. You can create a style for this and then apply it to all your buttons. Modify src/main/res/values/style.xml so it looks like this:
1
2
3
4
5
6
7
8
9
10
11
12
13
<?xml version="1.0" encoding="UTF-8" ?>
<resources>
  <style name="NewTheme" parent="Theme.AppCompat.Light">
    <item name="windowNoTitle">true</item>
  </style>

  <style name="NavButton" parent="@style/Widget.AppCompat.Button.Borderless">
    <item name="android:layout_marginBottom">-10dip</item>
    <item name="android:layout_marginLeft">-10dip</item>
    <item name="android:layout_marginRight">-10dip</item>
    <item name="android:layout_marginTop">-10dip</item>
  </style>
</resources>
And then apply the style to the buttons:
1
2
3
4
5
6
7
8
9
10
11
12
13
14
15
16
17
18
19
20
21
22
23
24
25
26
27
28
29
30
31
32
33
34
<?xml version="1.0" encoding="utf-8"?>
<LinearLayout
    xmlns:android="http://schemas.android.com/apk/res/android"
    android:layout_width="fill_parent"
    android:layout_height="wrap_content"
    android:orientation="vertical">
  <LinearLayout
      android:layout_width="match_parent"
      android:layout_height="40dip"
      android:orientation="horizontal">
    <ImageButton
      android:layout_height="match_parent"
      android:layout_weight="1"
      android:layout_width="wrap_content"
      android:src="@drawable/ic_add_black_24dp"
      style="@style/NavButton" />
    <ImageButton
      android:layout_height="match_parent"
      android:layout_weight="1"
      android:layout_width="wrap_content"
      android:src="@drawable/ic_people_black_24dp"
      style="@style/NavButton" />
    <ImageButton
      android:layout_height="match_parent"
      android:layout_weight="1"
      android:layout_width="wrap_content"
      android:src="@drawable/ic_menu_black_24dp"
      style="@style/NavButton" />
  </LinearLayout>
  <LinearLayout android:layout_height="1dip"
      android:layout_width="match_parent"
      android:background="#000">
  </LinearLayout>
</LinearLayout>
This gives us a nice navigation bar with ripple effect.
mobile android java programming projects 


