In this post we’re going to configure neovim to work with Arduino Language Server.
Nvim Lsp Config
Neovim comes with an LSP client included, nvim-lspconfig is a plugin that helps us configure the client so it can talk to LSP servers.
This configuration should be enough to get started with Arduino:
1
2
3
4
5
6
return {
  "neovim/nvim-lspconfig",
  config = function()
    require('lspconfig').arduino_language_server.setup {}
  end
}
Mason
Neovim runs the LSP client, but it needs to communicate with an LSP server to do its job. We can manually install LSP servers for the languages we are interested in and manually start them and stop them as needed, or we can use Mason and Mason-lspconfig to take care of installing and starting the servers when necessary.
For the mason configuration, this will suffice:
1
2
3
4
5
6
7
return {
  'williamboman/mason.nvim',
  build = ":MasonUpdate",
  config = function()
    require("mason").setup()
  end
}
We will also need the following mason-lspconfig configuration:
1
2
3
4
5
6
7
8
9
10
11
12
13
14
15
return {
  "williamboman/mason-lspconfig.nvim",
  dependencies = {
    'williamboman/mason.nvim',
  },
  config = function()
    require("mason-lspconfig").setup({
      ensure_installed = {
        'arduino_language_server',
        -- We need to install clangd for arduino_language_server to work
        'clangd'
      }
    })
  end
}
Next time we start Neovim, we should get these messages (Use the :messages command to print the latest messages in Neovim):
1
2
3
4
[mason-lspconfig.nvim] installing arduino_language_server
[mason-lspconfig.nvim] arduino_language_server was successfully installed
[mason-lspconfig.nvim] installing clangd
[mason-lspconfig.nvim] clangd was successfully installed
Setting up Arduino LSP
Although Mason takes care of installing Arduino Language Server, we also need arduino-cli in our system. Instructions for installing it can be found in the Arduino CLI documentation
We are also required to have an arduino-cli config file in ~/.arduino15/arduino-cli.yaml. We can create it with this command:
1
arduino-cli config init
And install the correct core for our board. For example:
1
arduino-cli core install arduino:renesas_uno
Let’s create a new Sketch to test our configuration:
1
arduino-cli sketch new TestSketch
To help the language server understand our project we need to create a sketch.yaml file. We can do it with this command:
1
2
cd TestSketch
arduino-cli board attach -p /dev/ttyACM0 -b arduino:renesas_uno:unor4wifi TestSketch.ino
To see Arduino LSP in action, open TestSketch.ino and delete the last bracket in the file. We’ll get an error telling us that there is a missing bracket:
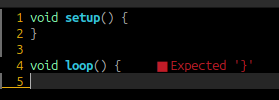
Arduino LSP Features
We already saw that Arduino Language Server can tell us when we have syntax errors in our code. In Neovim, we call this diagnostics. In this section we are going to explore what other things we can do with Arduino LSP.
Go to definition
If we want to see the definition of a symbol under our cursor, we can use this command:
1
:lua vim.lsp.buf.definition()
This will replace the current buffer with the definition of the symbol that was under our cursor.
Another way to achieve the same, is to use C-] (Control + ]). After doing this, we can return to where we were by using C-t.
Since these key bindings are a little hard to type, I like to add these shortcuts to my Neovim configuration:
1
2
3
4
5
6
7
8
9
10
11
12
13
vim.api.nvim_create_autocmd('LspAttach', {
  desc = 'LSP actions',
  callback = function(event)
    -- Go to definition
    vim.keymap.set('n', 'gd', '<cmd>lua vim.lsp.buf.definition()<cr>', {buffer = event.buf})

    -- Return to previous location after going to definition
    vim.api.nvim_set_keymap('n', 'gb', '<C-t>', {})

    -- Go to definition in new tab
    vim.api.nvim_set_keymap('n', 'gdt', '<C-w><C-]><C-w>T', {})
  end
})
This way, I can use gd to go to a definition in the same buffer, gb to return and gdt to go to the definition in a new tab.
Code completion
We can trigger code completion with the combination: C-x C-o.
For example, if we type matrix. and then C-x C-o, we will get a pop-up with the available options:
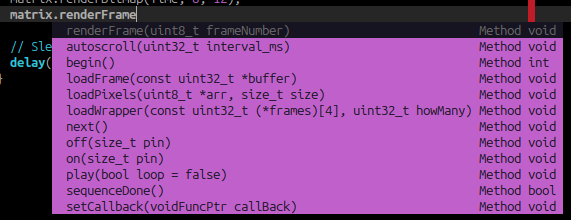
We can navigate the options with the up (or Ctrl-p) and down (or Ctrl-n) arrows and select the one we want with enter.
I’m not sure why, but by default, a new buffer is opened whenever an completion is triggered. We can add this to our configuration to avoid this behavior:
1
vim.o.completeopt = 'menu'
Since C-x C-o is a little hard to type, I prefer to use C-Space to trigger the completion. We can use this configuration for that:
1
vim.api.nvim_set_keymap('i', '<C-Space>', '<C-x><C-o>', {})
Show documentation
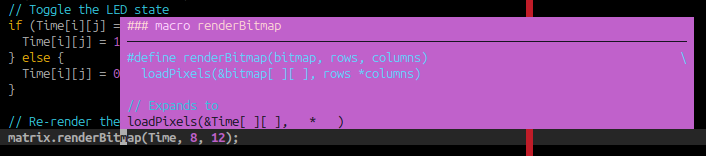
We can get a pop up with documentation for the symbol under our cursor with this command:
1
:lua vim.lsp.buf.hover()
The result looks like this:
We can set a key map so the documentation shows when pressing K:
1
vim.keymap.set('n', 'K', '<cmd>lua vim.lsp.buf.hover()<cr>', {buffer = event.buf})
Code formatting
To format our code, we can use:
1
:lua vim.lsp.buf.format()
To map F to code formatting, we can use this configuration:
1
vim.keymap.set('n', 'F', '<cmd>lua vim.lsp.buf.format()<cr>', {buffer = event.buf})
Renaming
We can rename a symbol among our project using:
1
:lua vim.lsp.buf.rename()
We will get a prompt similar to:
1
New Name: matrix
Where we can change the name of the symbol and press enter.
We can map this to the number 3 like so:
1
vim.keymap.set('n', '3', '<cmd>lua vim.lsp.buf.rename()<cr>', {buffer = event.buf})
Autocomplete
In the previous section we learned how we can do code completion on demand, but most IDEs do code completion automatically as we type. To get this kind of functionality we need another plugin: nvim-cmp.
We can use this configuration:
1
2
3
4
5
6
7
8
9
10
11
12
13
14
15
16
17
18
19
20
21
22
23
24
25
26
27
return {
  'hrsh7th/nvim-cmp',
  dependencies = {
    'hrsh7th/cmp-nvim-lsp'
  },
  config = function()
    local cmp = require("cmp")
    cmp.setup({
      mapping = cmp.mapping.preset.insert({
        ['<C-o>'] = cmp.mapping.complete(),
        ['<C-e>'] = cmp.mapping.abort(),
        ['<CR>'] = cmp.mapping.confirm({ select = true }),
      }),
      snippet = {
        expand = function(args)
          require('luasnip').lsp_expand(args.body)
        end,
      },
      sources = cmp.config.sources({
        { name = 'nvim_lsp' },
        { name = 'luasnip' },
      }, {
        { name = 'buffer' },
      }),
    })
  end
}
Now, we will automatically get suggestions as we type:
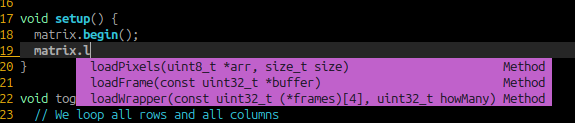
We can also navigate the options with the up (or Ctrl-p) and down (or Ctrl-n) arrows and select the one we want with enter.
Conclusion
After following these instructions we will be able to enjoy most of the features offered by Arduino Language Server within our already familiar Neovim.
arduino electronics productivity vim