I made this little open source library for Android that I want to consume from an app I’m building. I have the easy option of checking in the .aar file into my repository as explained in my article but I want to do things right so I’m going to try to publish my app to central repository.
To get started you have to create a jira account and then create a ticket so they can create a project for you. There are a few mandatory fields:
– Summary: I am not sure what I was supposed to enter here so I just entered the name of my project. (conversion-graph)
– Group Id: The top level group you are going to use. (com.ncona)
– Project URL: I entered URL to the project on github. (https://github.com/soonick/conversion-graph)
– SCM URL: The same URL but with a .git extension (https://github.com/soonick/conversion-graph.git)
The next day I got an e-mail telling me that I could now make deploys. (It is important to wait for this e-mail before you proceed, otherwise the world ends).
It is part of Sonatype requirements that you supply a package for javadoc and a package for sources. You can generate a sources jar by adding these lines to build.gradle:
1
2
3
4
task sourcesJar(type: Jar) {
  classifier = 'sources'
  from android.sourceSets.main.allSource
}
To generate your javadoc jar you will need something like this:
1
2
3
4
5
6
7
8
9
task androidJavadocs(type: Javadoc) {
  source = android.sourceSets.main.allSource
  classpath += project.files(android.getBootClasspath().join(File.pathSeparator))
}

task androidJavadocsJar(type: Jar) {
  classifier = 'javadoc'
  from androidJavadocs.destinationDir
}
Then you need to add them to the artifacts collection:
1
2
3
artifacts {
  archives androidJavadocsJar, sourcesJar
}
Before we can continue with the publishing part we need to create GPG keys so we can sign our artifacts:
1
gpg --gen-key
You can use the defaults for most of the values. Fill your data for the other fields and make sure to use a good password that you wont forget. After creating your keys, you will want to make your public key available to the public so they can use it to verify that your artifacts were actually signed by your private key. You can publish your key with this command:
1
gpg2 --keyserver hkp://pool.sks-keyservers.net --send-keys 2CCE6FB4
The number at the end of that command is the id of my public key, which you can get with this command:
1
2
3
4
5
6
gpg --list-keys
/home/ncona/.gnupg/pubring.gpg
--------------------------------
pub   2048R/2CCE6FB4 2014-09-03
uid                  Some Name <somemail@yahoo.com.mx>
sub   2048R/6F248598 2014-09-03
The next step is to modify your build.gradle so it knows how to sign and publish your artifacts to a maven repository. There are two gradle plugins that help us with this:
1
2
apply plugin: 'maven'
apply plugin: 'signing'
To take care of the signing add this to build.gradle:
1
2
3
signing {
  sign configurations.archives
}
And this to gradle.properties:
1
2
3
signing.keyId=2CCE6FB4
signing.password=YourKeyP455WORD!
signing.secretKeyRingFile=/home/ncona/.gnupg/secring.gpg
For the publishing part you can paste this into build.gradle (Make sure to modify my project information with that of your project):
1
2
3
4
5
6
7
8
9
10
11
12
13
14
15
16
17
18
19
20
21
22
23
24
25
26
27
28
29
30
31
32
33
34
35
36
37
38
39
40
41
42
43
44
45
46
group = "com.ncona"
archivesBaseName = "conversion-graph"
version = "1.0.0"

uploadArchives {
  repositories {
    mavenDeployer {
      beforeDeployment { MavenDeployment deployment -> signing.signPom(deployment) }

      repository(url: "https://oss.sonatype.org/service/local/staging/deploy/maven2/") {
        authentication(userName: ossrhUsername, password: ossrhPassword)
      }

      snapshotRepository(url: "https://oss.sonatype.org/content/repositories/snapshots/") {
        authentication(userName: ossrhUsername, password: ossrhPassword)
      }

      pom.project {
        name 'Conversion graph'
        packaging 'aar'
        description 'Graphs a conversion path'
        url 'https://github.com/soonick/conversion-graph'

        scm {
          url 'https://github.com/soonick/conversion-graph'
          connection 'scm:git:https://github.com/soonick/conversion-graph.git'
        }

        licenses {
          license {
            name 'The Apache License, Version 2.0'
            url 'http://www.apache.org/licenses/LICENSE-2.0.txt'
          }
        }

        developers {
          developer {
            id 'soonick'
            name 'Adrian Ancona Novelo'
            email 'soonick5@yahoo.com.mx'
          }
        }
      }
    }
  }
}
And add this to gradle.properties:
1
2
ossrhUsername=YourSonatypeUsername
ossrhPassword=YourSonatypePassword
To verify that everything worked fine run a build:
1
gradle build
And try to publish:
1
gradle uploadArchives
Once the upload finishes successfully you should be able to log in to Sonatype and see your artifacts in the Staging Repositories list.
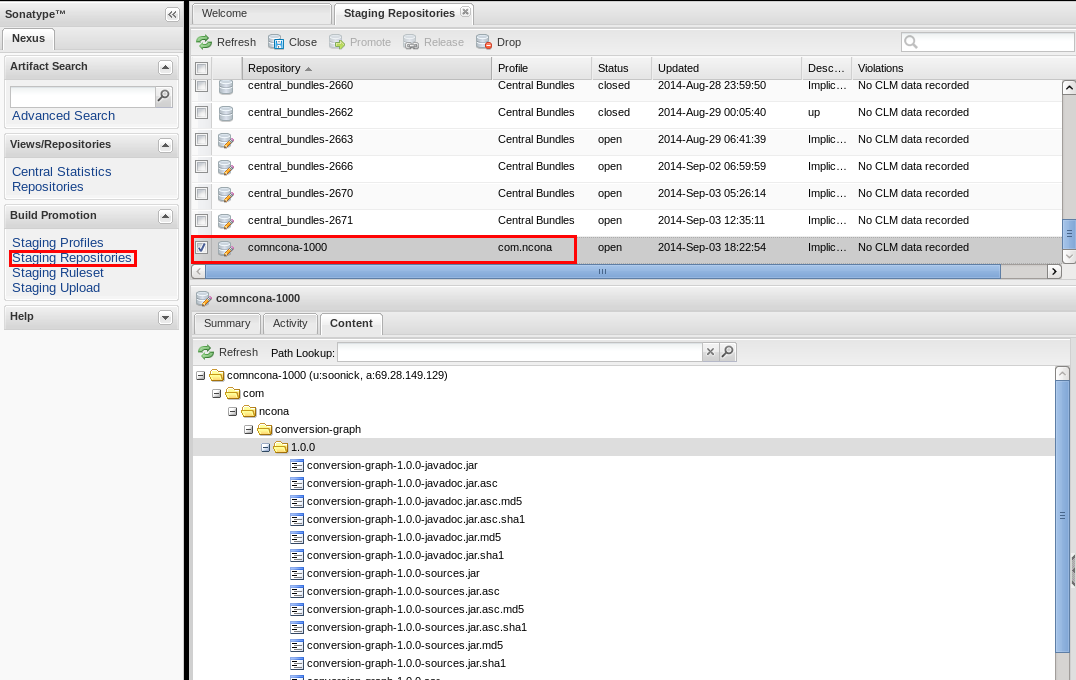
From here you will be able to examine the artifacts you uploaded. If you see anything wrong you can drop the repository and try again. If everything looks good you will want to close it and then release it.
If this is the first time you are releasing your package you will need to go back to the Jira ticket you opened in the beginning and let them know that you have done a release. This will let them know that they can start the sync process.
Finally, you will be able to find your artifacts published in Sonatype: https://oss.sonatype.org/content/groups/public
android automation mobile