If you are not familiar with networking concepts on AWS, I recommend you take a look at my introduction to aws networking.
A Bastion host (also called Jumpbox) is used to protect hosts that are part of a private network, while still allowing access to them over the Internet. If a system administrator needs to access other hosts, It needs to first SSH to the Bastion and from there, SSH to any other host.
Being exposed to the Internet, the Bastion becomes the target of attackers and should be a central part of our security plan.
In my introduction to aws networking I showed how we can expose a web server to the Internet. In the example, we exposed ports 80 and 22 of the host so visitors could access it using a browser, and we could SSH to it for administrative purposes.
In this post we’re going to add a Bastion host that can only be accessed on port 22, and modify the web server so it only exposes port 80 to the Internet.
Restricting SSH access
The final state of the network in my introduction article looks this:

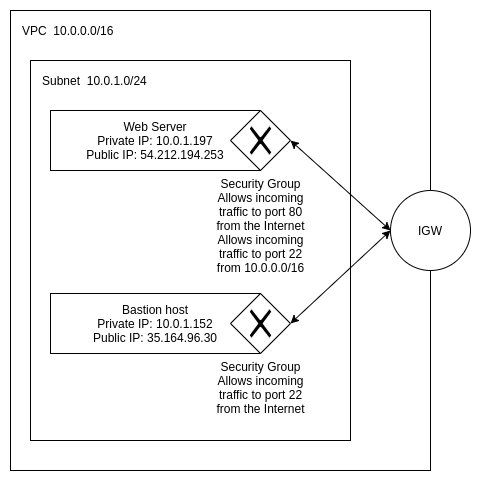
In this network, IGW serves as a proxy from the Internet to the private network. Since the Web Server has a public IP address, all traffic from the Internet to that IP address will be forwarded.
The diagram also shows a Security Group that allows all incoming traffic to ports 22 and 80; traffic to any other port will be discarded.
To make our web server a little more secure we will modify the Security Group rules, so it allows all incoming traffic to port 80, but only allows incoming traffic to port 22 from within the VPC.
Let’s look at the current state of the Security Group:
1
2
3
4
5
6
7
8
9
10
11
12
13
14
15
16
17
18
19
20
21
22
23
24
25
26
27
28
29
30
31
32
33
34
35
36
37
38
39
40
41
42
43
44
45
46
47
48
49
50
51
52
53
54
55
aws --region us-west-2 ec2 describe-security-groups \
    --group-ids sg-0c7648d368c273f03

{
    "SecurityGroups": [
        {
            "Description": "Used by web servers",
            "GroupName": "web-server-sg",
            "IpPermissions": [
                {
                    "FromPort": 80,
                    "IpProtocol": "tcp",
                    "IpRanges": [
                        {
                            "CidrIp": "0.0.0.0/0"
                        }
                    ],
                    "Ipv6Ranges": [],
                    "PrefixListIds": [],
                    "ToPort": 80,
                    "UserIdGroupPairs": []
                },
                {
                    "FromPort": 22,
                    "IpProtocol": "tcp",
                    "IpRanges": [
                        {
                            "CidrIp": "0.0.0.0/0"
                        },
                    ],
                    "Ipv6Ranges": [],
                    "PrefixListIds": [],
                    "ToPort": 22,
                    "UserIdGroupPairs": []
                }
            ],
            "OwnerId": "758883867384",
            "GroupId": "sg-0c7648d368c273f03",
            "IpPermissionsEgress": [
                {
                    "IpProtocol": "-1",
                    "IpRanges": [
                        {
                            "CidrIp": "0.0.0.0/0"
                        }
                    ],
                    "Ipv6Ranges": [],
                    "PrefixListIds": [],
                    "UserIdGroupPairs": []
                }
            ],
            "VpcId": "vpc-02f80e3f64618ce87"
        }
    ]
}
The IpPermissions attribute shows our ingress rules. Let’s start by disallowing all access to port 22:
1
2
3
4
5
aws --region us-west-2 ec2 revoke-security-group-ingress \
    --group-id sg-0c7648d368c273f03 \
    --protocol tcp \
    --port 22 \
    --cidr 0.0.0.0/0
To allow traffic from within the VPC, we can open port 22 to the same CIDR block as the VPC:
1
2
3
4
5
aws --region us-west-2 ec2 authorize-security-group-ingress \
    --group-id sg-0c7648d368c273f03 \
    --protocol tcp \
    --port 22 \
    --cidr 10.0.0.0/16
Another option could be to make all hosts part of the same Security Group, or allow traffic from a different Security Group and make sure all hosts that should be allowed to access are added to that Security Group.
We have now made it impossible to access the network from the Internet using SSH.
Creating a Bastion host
A Bastion host is just another machine in our network, that will be made available to the internet on port 22. Since we don’t have a Security Group that allows ingress only on port 22, we need to create one:
1
2
3
4
5
6
7
8
aws --region us-west-2 ec2 create-security-group \
    --group-name bastion-sg \
    --description "Bastion hosts" \
    --vpc-id vpc-02f80e3f64618ce87

{
    "GroupId": "sg-089b9ed2ffe6251cf"
}
The security group needs to allow traffic on port 22:
1
2
3
4
5
aws --region us-west-2 ec2 authorize-security-group-ingress \
    --group-id sg-089b9ed2ffe6251cf \
    --protocol tcp \
    --port 22 \
    --cidr 0.0.0.0/0
To SSH to the host we need to provide an SSH key-pair. Let’s create one:
1
2
3
4
5
aws --region us-west-2 ec2 create-key-pair \
    --key-name bastion-ssh \
    | jq -r ".KeyMaterial" > bastion-ssh.pem

chmod 400 bastion-ssh.pem
We can now start the host:
1
2
3
4
5
6
7
8
9
10
11
12
13
14
15
16
17
18
19
20
21
aws --region us-west-2 ec2 run-instances \
    --subnet-id subnet-0810371619b72f212 \
    --security-group-ids sg-089b9ed2ffe6251cf \
    --image-id ami-003634241a8fcdec0 \
    --instance-type t2.micro \
    --associate-public-ip-address \
    --key-name bastion-ssh \
    --count 1

{
    "Instances": [
        {
            ...
            "InstanceId": "i-0ce450d7414d6cf8d",
            ...
            "PrivateIpAddress": "10.0.1.152",
            ...
        }
    ],
    ...
}
To get the public IP address that was assigned to the instance, we need to describe it:
1
2
3
4
5
6
7
8
aws --region us-west-2 ec2 describe-instances \
    --instance-ids i-0ce450d7414d6cf8d

{
  ...
  "PublicIpAddress": "35.164.96.30",
  ...
}
Our network looks like this:
We can now SSH to the Bastion:
1
ssh -i "bastion-ssh.pem" ubuntu@35.164.96.30
If we try to SSH to the web server from our Bastion we will get an error:
1
2
ssh ubuntu@10.0.1.197
ubuntu@10.0.1.197: Permission denied (publickey).
What this message is telling us is that we tried to SSH to the host with a key that is not valid. Our web server only allows connections with the key named web-ssh. This key doesn’t exist in the Bastion host, so the connection is refused.
One possible solution would be to copy the necessary SSH key to the Bastion so it’s available for us. A better solution is ssh-agent forwarding.
ssh-agent forwarding
Our network currently has two hosts:
- Web server - Requires
web-sshkey - Bastion host - Requires
bastion-sshkey
A not very good solution to our problem would be to add the web-ssh key to our Bastion host and anybody who gets access to the Bastion can use it to SSH to the web server.
This is not ideal because we might have different users that can SSH to the Bastion, but they have access to a different subset of hosts (with different key pairs). Having the keys in the Bastion would allow anybody to access all hosts.
Another option would be have users copy their SSH key to the bastion using scp. This could be a problem if the SSH key is copied to a shared location and can be seen by other users. It is also not considered a good practice to have copies of a private key.
The usual solution to this problem is using ssh-agent forwarding.
ssh-agent is a daemon that runs in our machine and keeps all the private keys in memory so we don’t have to enter the passphrases every time we need to use them.
It is also possible to allow other hosts to access our local ssh-agent to get keys from it. More specifically, we can whitelist the Bastion server so it can get our SSH keys while we are on it.
We start by adding our SSH keys to ssh-agent:
1
2
3
4
5
ssh-add bastion-ssh.pem
Identity added: bastion-ssh.pem (bastion-ssh.pem)

ssh-add web-ssh.pem
Identity added: web-ssh.pem (web-ssh.pem)
We can verify that they were added:
1
2
3
$ ssh-add -l
2048 SHA256:sm87vVLANT/e1BHSijq0KbWy+Wx+WD34nltJqKVIPPs bastion-ssh.pem (RSA)
2048 SHA256:caz0wLhmPW7U6mb+/ZD+c66zxWmC/pUPfCEkHIYpXPY web-ssh.pem (RSA)
To enable agent forwarding we need to modify ~/.ssh/config:
1
2
Host 35.164.96.30
  ForwardAgent yes
This enables forwarding only for the bastion host.
Since our keys are registered with ssh-agent, we can SSH to our hosts without having to specify which key to use.
To SSH to our Bastion:
1
ssh ubuntu@35.164.96.30
From there we can SSH to the web server:
1
ssh ubuntu@10.0.1.197
If everything worked fine, it means our Bastion set-up was successful.
Conclusion
In this post we learned how we can configure a Bastion host using AWS and how we can use ssh-agent to have our keys forwarded to that host. There is still a lot more to learn about AWS networking, so I’ll continue exploring features in future articles.
architecture aws networking security