A NAT (Network Address Translation) Gateway can be used to allow an instance in a private Subnet to communicate with the Internet while preventing the Internet from initiating connections to it.
In my previous article I explained how to create a bastion host. In this article I’m going to create a private Subnet in the same VPC, and I’m going to allow this Subnet to initiate connections to the Internet without giving the instances a public IP address.
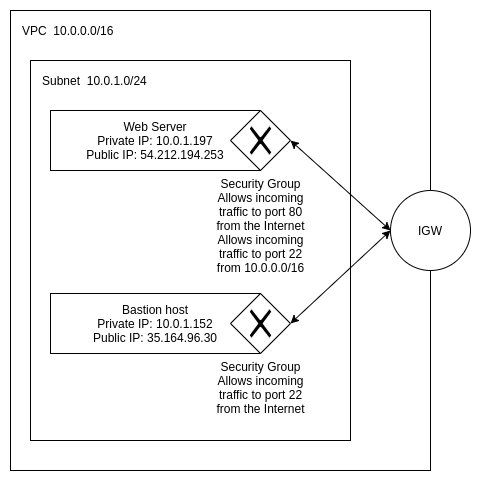
The end result of my article about creating a bastion host was this:
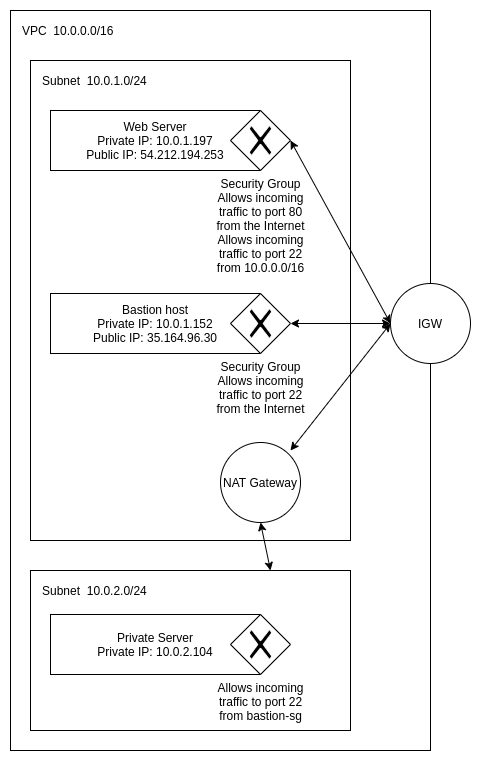
The end result of this article is going to be:
Creating the prerequisites
Before we start looking at our NAT Gateway, let’s start with some prerequisites:
- A private Subnet for our instance
- A Security Group for private instances
- This SG needs to allow incoming SSH access from the bastion
- An SSH key-pair for private instances
- An EC2 instance
1
2
3
4
5
6
7
8
9
10
11
12
13
14
15
16
17
18
19
20
21
22
23
24
25
26
27
28
29
30
31
32
33
34
35
36
37
38
39
40
41
42
43
44
45
46
47
48
49
50
51
52
53
54
55
56
57
58
59
60
61
62
63
64
65
66
67
68
69
## The Subnet
aws --region us-west-2 ec2 create-subnet \
    --cidr-block 10.0.2.0/24 \
    --availability-zone us-west-2b \
    --vpc vpc-02f80e3f64618ce87

{
    "Subnet": {
        "AvailabilityZone": "us-west-2b",
        "AvailableIpAddressCount": 251,
        "CidrBlock": "10.0.2.0/24",
        "DefaultForAz": false,
        "MapPublicIpOnLaunch": false,
        "State": "pending",
        "SubnetId": "subnet-071c846cda755d302",
        "VpcId": "vpc-02f80e3f64618ce87",
        "AssignIpv6AddressOnCreation": false,
        "Ipv6CidrBlockAssociationSet": []
    }
}

aws --region us-west-2 ec2 create-tags \
    --resources subnet-071c846cda755d302 \
    --tags Key=Name,Value=OurNetworkPrivateSubnet

## The Security Group
aws --region us-west-2 ec2 create-security-group \
    --group-name private-server-sg \
    --description "Used by private instances (Not facing the Internet)" \
    --vpc-id vpc-02f80e3f64618ce87

{
    "GroupId": "sg-0dd8705b531b41918"
}

aws --region us-west-2 ec2 authorize-security-group-ingress \
    --group-id sg-0dd8705b531b41918 \
    --protocol tcp \
    --port 22 \
    --source-group sg-089b9ed2ffe6251cf

## The key-pair
aws --region us-west-2 ec2 create-key-pair \
    --key-name private-ssh \
    | jq -r ".KeyMaterial" > private-ssh.pem

chmod 400 private-ssh.pem

## The EC2 instance
aws --region us-west-2 ec2 run-instances \
    --subnet-id subnet-071c846cda755d302 \
    --security-group-ids sg-0dd8705b531b41918 \
    --image-id ami-003634241a8fcdec0 \
    --instance-type t2.micro \
    --key-name private-ssh \
    --count 1

{
    "Groups": [],
    "Instances": [
        {
            ...
            "InstanceId": "i-00b4d7a6ef56afccd",
            ...
            "PrivateIpAddress": "10.0.2.104",
            ...
    ],
    ...
}
At this point we have a private instance that we can access using our Bastion, but since it doesn’t have a public IP address, it can’t access the Internet:
1
2
3
4
5
6
7
8
# SSH to bastion
ssh ubuntu@35.164.96.30

# SSH to private instance
ssh ubuntu@10.0.2.104

# Try to talk to the Internet. This command will fail
ping ncona.com
NAT Gateway
As explained at the beginning of this article, a NAT Gateway is used to allow a private instance to communicate with the Internet. The NAT Gateway needs to be part of the public Subnet and have an Elastic IP address associated to it.
Our private Subnet needs to be configured so outgoing traffic to the Internet is routed to the NAT Gateway. When the NAT Gateway sees a request, it will send it to the Internet using its IP address and then forward the response to the original caller.
The Elastic IP (EIP)
An EIP address is a public IP address assigned to an AWS account. The IP address can be assigned to a resource, and moved to a different resource in the future if necessary. This allows for quick recovery if the resource under that IP address fails.
To allocate an EIP for our account:
1
2
3
4
5
6
7
aws --region us-west-2 ec2 allocate-address

{
    "PublicIp": "44.226.149.153",
    "AllocationId": "eipalloc-08504dd801c42d654",
    "Domain": "vpc"
}
The NAT Gateway
Once we have our EIP, we can create our NAT Gateway:
1
2
3
4
5
6
7
8
9
10
11
12
13
14
15
16
17
18
aws --region us-west-2 ec2 create-nat-gateway \
    --allocation-id eipalloc-08504dd801c42d654 \
    --subnet-id subnet-0810371619b72f212

{
    "NatGateway": {
        "CreateTime": "2020-05-02T08:46:57.000Z",
        "NatGatewayAddresses": [
            {
                "AllocationId": "eipalloc-08504dd801c42d654"
            }
        ],
        "NatGatewayId": "nat-0988f634fdf01aafe",
        "State": "pending",
        "SubnetId": "subnet-0810371619b72f212",
        "VpcId": "vpc-02f80e3f64618ce87"
    }
}
Notice that we are creating it in our public Subnet.
The next step is to have our private Subnet redirect Internet traffic to the NAT gateway. To do this, we need to modify the route table. Since we didn’t specify a route table for the Subnet, it’s using the default route table for the VPC. Let’s create a route table for our private Subnet:
1
2
3
4
5
6
7
8
9
10
11
12
13
14
15
16
17
18
19
20
aws --region us-west-2 ec2 create-route-table \
    --vpc-id vpc-02f80e3f64618ce87

{
    "RouteTable": {
        "Associations": [],
        "PropagatingVgws": [],
        "RouteTableId": "rtb-082142cae06e81a8c",
        "Routes": [
            {
                "DestinationCidrBlock": "10.0.0.0/16",
                "GatewayId": "local",
                "Origin": "CreateRouteTable",
                "State": "active"
            }
        ],
        "Tags": [],
        "VpcId": "vpc-02f80e3f64618ce87"
    }
}
As we can see in the output, the route table will by default work for instances in the same Subnet. We need to create a new rule that sends outgoing traffic to the NAT Gateway:
1
2
3
4
aws --region us-west-2 ec2 create-route \
    --route-table-id rtb-082142cae06e81a8c \
    --nat-gateway-id nat-0988f634fdf01aafe \
    --destination-cidr-block 0.0.0.0/0
Finally, we attach the route table to our private Subnet:
1
2
3
4
5
6
7
aws --region us-west-2 ec2 associate-route-table \
    --route-table-id rtb-082142cae06e81a8c \
    --subnet-id subnet-071c846cda755d302

{
    "AssociationId": "rtbassoc-0d2ff0259ec6d187b"
}
We can now SSH to our instance and verify that it can reach the Internet:
1
2
3
4
5
6
7
8
# SSH to bastion
ssh ubuntu@35.164.96.30

# SSH to private instance
ssh ubuntu@10.0.2.104

# This time it succeeds
ping ncona.com
Conclusion
In this article I showed how a NAT Gateway can be used to allow private instances to reach the Internet. This can be useful if we have internal services that need to talk to third party services to perform their job, or to download updates.
architecture aws networking security